A Megagame of Intrigue and Lineage
by Kristian Akhurst
✍︎ A Note for Readers -
Beta – Note to proof readers the following boilerplate is for the eventual live version and may not all be currently true. Obviously if you are proofreading the document I would like you to read the whole thing, though if you do plan to play the game now would be a good time to opt out^
This website is the full, uncensored resource repository for Babayaga the Megagame. This is useful for transparency in the full context of the rules and targeted at anyone wanting to run the game. However, in being so transparent, many parts of the game which would otherwise be kept as secrets, could inform sensitive information, or would otherwise give undue advantage to Players and spoil certain reveals are present in this repository and not always heavily demarcated as such.
Therefore; the reader is advised to only read what they need to of these rules before playing or running the game. Only the Showrunner should read all that is included here as Control team members may also be future Players, so proceed with caution if you ever plan on playing in the game rather than only helping to facilitate it.
Most sections will contain metadata indicating which sections of these rules are player facing and any especially sensitive content is tagged with a spoiler warning for the intrepid. The release version will also include pdf and downloadable resources which will indicate to whom they should be sent when preparing the game.
The 'main handbook' is a complete guide to the game containing all optional rules for each Player type as well as notes for the Control Team and Showrunner. The other handbooks are cut down versions of the main handbook, containing only the rules which are pertinent to each role. The goal of the handbooks is to clear up any ambiguity in the intent of the rules but they may not necessarily be the best first point of introduction for either the Control team members, or Players.
In the resources will be included a compressed, short pamphlet for each role, outlining the key objectives and rules of note for each role in the game. These quick rules are to be distributed with the briefing material and should be a sufficient primer for the game, considering all attendees may not have the time or inclination to read the full ruleset. The full Player rules can be distributed but mainly for the curious or referenced in resolving potential disputes.
The hosted version of these rules are a living document that will be updated with the most up to date version of the rules as they are refined. The print friendly materials will be locked at each major version. It is recommended that when choosing a version of the game to run, that you lock in on one major version, even if you are making modifications. This not only helps Players to find out ‘which version’ of the game they have played but will also help standardise a source of truth for the Control team. The ‘main rulebook’ here will always be updated to the active meta of the game but version branches will be archived, if you wish to consult a particular, past version in the online rules.
If you find anything wrong, deprecated, or incomplete please report it to either the ‘Megagame Design Club’ discord server, or directly to the designers via;
hello@stormlantern.games
The rules and resources included on this site are copyrighted to Kristian Akhurst, Stormlantern Games, 2025 with all rights reserved.
Beta - I will have a proper license and distribution terms before the game is run. The intention is to amortise the game through a small license fee that grants access to all future updates and to distribute as many of the resources for the game here as digital downloads for print and play, as posible.
Introduction -
Jarlsland; A nation tortured by the in-drawn breath of insurrection. A court racked by suspicion and superstition. A rebellion, nascent and vulnerable.
Then came the Babayaga.
The crone, the hag, a shade from a past some had honestly tried to forget. Emerging from the Jarlswood, she sweeps across the land, invulnerable, a thing of nightmares. Heralded by the midnight - crack, pop - from her devilish house on avian legs. Neither nobility or common folk dare to openly oppose her enigmatic agenda. What Baba wants, Baba gets. When the Babayaga plucks the strings of the nation, everyone dances a marionette’s jig to her tune. If they stray too far, she will cut those threads and noble houses will fall.
A hostage from every house, demands the Baba. Apprentices in helping her mix her noxious tinctures and propagate her malign influence. All the while, the banners are raised in revolt. What does the Baba want? Why emerge from the Jarlswood now? And on the eve of a civil war no less... Amidst a nation gripped by fear, who submits to a fate, pre-drawn? And who dares move against the Babayaga?
🌐 Overview -
Babayaga is a megagame of court intrigue and secret lineage. Players take on a role as one noble family member in a team of four, representing their House during the opening days of the Jarlsland Civil War.
On one side, Players will support ‘The Covenant of the Iron Watch.’ This is the loyalist faction based in the, ‘Central Territories,’ which have declared for the current Tribune, monarch of the nation. On the opposing front, Players will fight for their liberties, as part of ‘The Volchenks Union,’ which is an alliance of the ‘Outer Territories,’ led by the new claimant to the Tribunate and rogue Central Territory of Tenann. The stage is set for a bloody Civil War, based in the intrigue and lies cast from both sides.
However, on the very eve of the rebel’s march into the capital, the Babayaga appears. Somehow appearing before both the Tribune’s Court in Rolcebad, and the claimant’s war council on the same night, the Baba reveals to them that neither of the opposed monarchs hold a true claim to the Tribunate, and that she alone knows who is the heir to inherit. The Baba claims to have stolen away the true Tribune, many years before, or so goes her tale. In return for revealing the identity of the true heir, the Baba demands one hostage from every House be sent to her cottage court. These hostages are to trial as her new apprentice and only after eight weeks will she reveal the true heir, as well as her selection for an apprentice. Furthermore, the Baba claims that the true heir, the provable descendent of the original Jarl, walks amongst the aristocracy, unknowingly, even now. What happens next? That is yet to be written.
🔇 Secrets -
This Gives Away the Secrets of the Game:
Warning; Heavy Spoilers beyond this point! For Control Team Eyes Only!
“The imbibed blood of a guilty babe, destined for power will, with the ritual of the Moon, bring all of that potential, youth, and influence to the one who spills their life force upon the Midnight Stone.”
The land upon which the Tribunate is built has a long history, and a cyclic one. Many civilizations have been birthed upon its fertile soils and as many have soon come to ruin. The Babayaga, sisters three, have seen them all and caused not an inconsiderable few to be consigned to the ignominy of unrecorded devastation.
The setup given to the House players is a bit of a fib. Where the Babayaga tells the aristocracy that the heir walks amongst them, and that she will reveal said heir to them, in eight weeks time; This is quite true. But, in addition, what is actually happening is somewhat different.
It turns out that the Babayaga has two sisters. She was meant to secret away the heir of Jarlsland for an ancient, primordial ritual, involving the heir's murder, in order to extend all of their lives through the draining of royal blood. This is a cycle that has been repeated on the same fertile land, since the beginning of the world. A kingdom will rise in the inviting river delta, the Babayaga sisters will end their royal line with the sacrifice of the heir, the kingdom will collapse, and the cycle will begin again. It was the Baba in question, whose turn it was to pull at a thread of the nascent kingdom, Jarlsland, and to retrieve such an heir. Babayaga convinced the Raieth’s bastard to kill the Tribune and to seize the circlet of that office for his own kin. In return they were promised lands, power and a future of prosperity for their line. During the chaos of that attempt, the Baba would secret away the child heir to her sisters, and the three would slay the babe upon the pitch surface of the Midnight Stone, an alter curently residing beneith the Palace in Rolcebad. The Baba, however, betrayed her sisters. At first she secreted the child away for herself and then, having grown to like the child, apprenticing it as her own. Having missed her opportunity to slay the heir in order to prolong her own existence, the Baba herself aged quickly. She died within a century of the events in the game. Her sisters continued their rituals, satiating themselves on lesser nobles who wandered into the Jarlswood, or got lost in the Moorscap ranges, enticing each with promises of greater power and indulgence. When the Baba died, her apprentice and the true heir, took over her household. Unknowing of her own lineage, she wandered Jarlsland in disguise, using her late master’s knowledge of herbalism to pass as a wandering apothecary. Eventually the story of her kidnapping became known to her, but only after she had given birth to a child, the true heir to Jarlsland. The father is never defined in the scope of the game, though this could be a narrative a path to follow, if it comes up.
In the lineage of each House there will be a thread to pull on that leads to these truths. Any House could potentially be the House of the heir with one of the Player filled spaces in the family tree being of unknown parentage or adopted. A Player positioned in that space on the family tree (there may be multiple) are each a potential candidate for the heir. This Player should be softly selected in advance, but should also be left somewhat nebulous in case a narrative opportunity arises during play. Think of it like ‘Schroedinger’s heir,’ for the purposes of facilitation.
The Control Team member who is playing Baba, should use the ‘random’ selection of her apprentice candidates to pick out all of the Player characters ‘born out of wedlock,’ including the selected heir. This may, or may not be noticed by the other players but either way, so be it.
The Coven -
There is another, key, secret team in the game that has not yet been mentioned. This ‘Coven’ team is made up of the Babayaga’s Sisters, the remaining two, and their loyal Crows. The Crows act like the apprentice candidates of the eponymous Baba, but in service to the Sisters. The Sisters and their Crows may move about the space, under the guise of being another of the main Babayaga’s apprentice candidates. This team should be encouraged to act surreptitiously and not to announce their presence, if they can avoid it. Confusion as to who they truly are will be their greatest weapon in achieving their goals.
While the House teams are pursuing their immediate objectives in jockeying for position, another conflict, one of will, continues below the surface. The Sisters’ agenda with their team is three fold, firstly; They must identify the location of the Babayaga and discover the true identity of the heir. They must murder one, then kidnap the other in order to then carry out the ritual, respectively. The Sisters are unaware that their third sister has, in fact, been dead for a century, and that the Baba which they are in conflict with is the erstwhile heir for whom they are searching. It is important that Contol does not reveal this to them, unless they make an effort to find it out ‘in game.’ See ‘Lore Stones’ for more information.
Secondly; The Coven must gain access to the Midnight Stone in the catacombs of the Palace in Rolcebad, to slay the captured heir.
Finally, the Coven must defend themselves and remain undiscovered by the Baba or her apprentice candidates while they attempt to achieve the above. They must also retrieve the first Jarl’s armour and weapons for the ritual, which will be held as ‘heirlooms’ in the noble houses.
The Coven Team will be sequestered in a separate space, have a map of their own and this, as opposed to the other Player maps, will have some information about the location of certain points of interest, populated by the Control Team. The Sisters and the Crows will have to negotiate with the House Players, in order to gain access to the ‘heirlooms,’ which they need for their ritual. Both Sisters and as many Crows as can be present must have travelled to Rolcebad, in order to conduct the ritual by the end of the game, if the ritual is to be completed successfully.
The Baba and her apprentices have the opposite goal; To defend the heir, remain undetected by the Coven and to reach the end of the game, without the ritual having taken place. This happens, all the while, with the small handicap that the Baba will not reveal to her apprentice candidates who she is or what she is doing, which may complicate things...
🎯 Ambitions and Goals -
At the start of the day in Babayaga, every noble, House Player, is aligned either with the Loyalist Covenant or the Volchenks Rebels. Every House has, by the start of the game, thrown their lot in with, and signed the various declarations that have led to this brewing conflict. With the arrival of the Babayaga things have become more...malleable.
As is so often the case, every member of the aristocracy is bound by certain expectations and the power of primogeniture is absolute. Beyond this, each noble has a responsibility to their House and family, their lands, but ultimately to themselves and their own advancement.
Before the day, each Player and House will have received their briefings on where their House sits ideologically, and how the realities of their particular position, and holdings may have led them to side with the alliance which they have chosen. Some are fiercely loyal, others driven by opportunism. What is universally true is that every House has arrived in their position, believing that their coalition has the best chance of victory and are determined to come out of this in a position of greater influence or power.
With the revelation from the Babayaga that another, third, clamant to the throne exists; Not only will some Houses begin to reevaluate those positions, but indeed question: "If the true heir may be anyone in the aristocracy, then who is best positioned to take advantage of that information?"
Not to put too fine a point on it, but if the Baba is to be believed and any one Player could prove to be the erstwhile ‘True Heir.’ Their emergence would upset the two sided balance of power between the existing factions significantly. Players are encouraged to think about how to prepare for and act on this information. Perhaps your House chooses to further ingratiate itself to the Babayaga, or perhaps these are lies designed to weaken both sides. Maybe she has a more complex ulterior motive, or maybe none at all. At any rate, the time for that reveal grows ever closer and it may be worth a Player using that time to figure out who their House’s true allies and enemies are.
Players and Houses are only as strong as the coalitions which they can build, and in this new reality those treaties may have to be redrawn, and fast.
👀 What the Game Looks Like -
A game of Babayaga goes for the length of most of a day in real time and throughout those hours Players will be engaged in negotiations, conflict, and gambits. The majority of the game will take place in a large space that can hold a table for every team/House as well as some other stations like the battlefield tables and the map rooms. Players will move around the space at different times to interact with other Players and forward their agenda outlined in the briefing documents that they will be sent before the event day.
Megagames, and Babayaga in particular, are open ended in how they will resolve by the end of the session. This is because they are driven by the Players choices, in response to scenarios presented to them throughout the day. Players are advised to hold what they know about the game loosely as though the game exists to offer a framework for the resolution of the scenarios presented, each Player will have a different agenda outlined in their briefing documents and the very landscape on which they plan to achieve their goals may shift during play and may do so rapidly.
The rules outlined in this handbook are as the game looks at the start of play, but all rules are malleable and Players will have mechanisms available to them in order to move the structure of the game toward their own advantage. Keep in mind that all Players have this ability and that you will likely be out manoeuvred or undercut, if you only attempt to play the rules as written.
🙌 The Control Team -
All of that being said, the rules are the rules until changed, and they will be enforced.
The Control Team, are a group of facilitators who are running the game. They will be moving around the space and adjudicating conflict between Players and their factions. Control are not a Player team and can be considered impartial. Control act a bit like the master of ceremonies, guiding the Players both in the rules, and mechanics of the game, as well as in forwarding the narrative. Members of the Control Team will be introduced at the beginning of the game and it is to this group any Player can go with questions about how the game can be played, clarification on rules, and for any surreptition and skulduggery they may wish to initiate.
Control’s power to enforce the rules is absolute, and due to the nature of an ever shifting game state, Control will have the ability to make calls that one Player or another may not agree with, in how they have understood the game. This can happen due to many factors and the Player should feel as though they can clarify a decision if they do not understand it. But the Player must keep in mind that Control cannot be in any way undercut or supplanted and their word is final.
The Control team is there to facilitate a good, fun space, for everyone and will attempt to make decisions that reward interesting play, without discounting the experience of other Players.
♟️ Playing the Game -
Players should expect to be involved in negotiations and conflict among their alliances and House. The narrative setup is intended to provoke Players to ask questions such as; ‘What if I, or one of my House is the new heir?’ ‘What if we’re not?’ ‘What if we send the true heir to apprentice the Babayaga on accident?’
The game proceeds with that ambiguity. The Baba, who will be played by a Control team member, will use her influence with the apprentices and spread her machinations throughout the game. This, mechanically, will become a pseudo third alliance. Some apprentice candidates may choose to turn, following Baba, while others may wish to remain loyal to their own House. Those that do, even so, could be treated with suspicion by their teammates.
The rhythm of the game, i.e. ‘weeks until Baba reveals the true heir,’ is treated as abstracted spans of time rather than a traditional game ‘turn’ and are referred to as ‘Rounds’ throughout this handbook to reinforce that distinction. Some of the game’s functions are designed to occur predictably throughout that time, such as; ‘At day break in the fourth round,’ or, ‘Before Noon in round five.” There will be a Control team role called, ‘The Narrator,’ who will facilitates the progression of the game’s narrative across the eight weeks (rounds) over which it takes place. Within that time, Players will be given the opportunity to forward their agenda, affecting the game’s progression by travelling around Jarlsland and initiating gambits of politics or war. Most of these opportunities will take the form of voluntary mechanics and involuntary responsibilities, assigned to particular roles.
All actions may be subject to opportunity cost. Where there are several things a Player might be doing at any one time, they must always choose between them in order to meet the deadline for any. The Control team will normally give a deadline to any Player's machinations but there is no limit to what a Player may try to accomplish in one, given round or timeframe apart from their own time management. Players are encouraged to plan ahead, create a scheme and push towards it, planning for hurdles and unexpected turns in advance.
❓What Players Know -
There is no ‘war map,’ or status board that is controlled by the facilitators in Babayaga, rather; There is a ‘Map Room’ for each, major, starting alliance where Players can consult their maps and help contextualise the game’s events. This is driven from the Players themselves.
There is no true, player facing, game state and information should be considered valuable, questionable and incomplete. Disinformation and betrayal is expected to feature highly in a game of Babayaga.
But what of the Baba herself? She has an agenda, for sure, and even her apprentices may be unaware of her true objective at any point. Players must decide how much time they spend each round scheming for the kingdom, and how much effort they put into unavailing the Baba’s true intent. Players may even choose to ally with the Babayaga, if they can. Her powers and knowledge are vast, though her treachery runs deep.
⏲️ Anatomy of a Round -
In Babayaga, the eight weeks of waiting are abstracted into eight rounds, each of which are further broken down into four phases; ‘Dawn,’ ‘Day Break,’ ‘High Noon,’ and ‘Gloaming’. Different parts of the game happen in the different phases of a round and for Players, timing plans in order to achieve a particular outcome, is an important skill to grasp early in the day.
Phase Breakdown -
| Phase: | Time: | Example Events: |
|---|---|---|
| Dawn | 10mins | Town Crier (Announcements), Duels, and Rituals |
| Day Break | 20mins | Travel, Gambits, and Battle Orders |
| High Noon | 15mins | Outcomes, and Consultations |
| Gloaming | 15mins | Team Time and Upkeep |
Each round will go for about an hour though in some cases the timer will be stopped to resolve complex events without time proceeding. Players should note that the game itself cold go longer or end earlier than anticipated, dictated by how the day and story unfolds.
Dawn -
The Dawn phase occurs at the very beginning of every round. During the Dawn phase, Players will be at liberty to begin drafting any dispatches and communications that they need for the following round, with some restrictions. Players who have been called to Duels must decide if they are attending and if so proceed to the battlefield area. Any betrothals will also be announced during this phase. This is also the time where updates in the game will be relayed by both Control and other Players. Players are not restricted in where they can be in the room during the Dawn phase but should not use this time to converse with other Players more than absolutely necessary. The Dawn phase is a personal preparation time and should be used to manage lands or prepare actions for the coming round. War Councils can be called for during the Dawn phase, but they may not convene until the subsequent phase.
Day Break -
Day Break is a phase for actioning plans. The most important thing for Players to make sure that they have done by the end of this phase is to have submitted their Travel Papers. In addition, any Gambits and Battle Orders need to be finalised and submitted to Control by the end of this phase. Day Break is also when Players should meet with their allies and attend any War Councils that they are invited to. Players with the Spider role should make contact with their assets during this time.
High Noon -
High Noon is when game events occur. Primarily, any Players involved in a Battle Order that round will need to go to the battlefield area in order to resolve conflicts. Gambits from the previous turn will begin to be actioned during this time also and affected Players will be informed how their character has been influenced. Intelligence projects will also progress during this time and Spiders will be informed if anything has been reported back through their intelligence networks.
Gloaming -
The Gloaming phase is a time for Players to return to their teams and organise for the next round. During this time Control will also lock in the production from each Player’s lands and determine whether each region is in good standing or turmoil. During team time, Players are encouraged to stay at their House, or an ally’s table to prepare for the start of the next round and touch base with their collaborators. Players should pick a table to stay at during this phase and generally not be moving around unless absolutely necessary.
🛂 Travel Papers -
In Babayaga, ‘where’ a Player’s character is, matters. Players are not restricted in their, real world, physical movement around the game space. They may consult with, or go to any station in the room, during each round of the game, at the appropriate times. Control only areas are excepted from this, of course, and will be pointed out at the start of the game.
Though the Players have freedom in how they choose to use their time, their first action on the ‘Day Break’ phase of a round should be to write down their, hidden, ‘travel papers.’ These papers commit a Player’s ‘character’ to where they intend on travelling during that round. For each round a Player must fill out their travel papers, if they intend to move, for that round and give it to a Control team member. Time is malleable in Babayaga and Jarlsland is small. Each of the territories are feasibly within travelling distance for the Players within each round. The flow of information in the Realm is often incomplete and difficult to audit. Therefore; Players can go and do anything that they like, but their ‘character’ must exist somewhere on the map, for a full round, each round.
Any effects or outcome from an event, that apply to specific places will be applied per round, during the ‘Gloaming’ phase. If an effect occurs in the general vicinity of where a Player’s character has travelled to in that round, then it is assumed it will affect them unless otherwise declared.
As an example, if a character is in the Capital Territory, Rolcebad – they are assumed to be engaged with ‘what is happening,’ in that territory. This is unless they have specifically stated that they are in a different place, for a different reason. If the palace happened to explode in that round (which does happen in megagames), it would not necessarily affect the Player in question, if they had so indicated that they were not present in the palace. If, however, they had written; ‘Capital Region – Rolcebad’ on their papers, then it might be a different story. Regions and travel can be fairly straight forward, but in certain situations where ambiguity exists, the Control team will make a call at the time on whether the Player is affected or not. This means that Players are encouraged to be as clear as possible when filling out their travel papers each round.
The positioning of the Player characters, as determined by their travel papers in a round, affects how events and other gambits are resolved for the broader game and narrative. For the Control team, knowing that a Player is in a certain location during a particular event resolution is necessary for the progression of the narrative as well as any mechanical considerations. For this reason if travel papers are not submitted in a round, on time, the Player’s character will be treated as if they have not moved that round.
Each accessible region will be controlled by someone. Technically it is good form for a member of the aristocracy, when travelling alone, to announce themselves to the ruling lord of that land. This is, however, a time of insurrection so in practice many have stopped observing this custom entirely. There will be a section on each travel paper sheet for the signature or mark of the acquiescing lord but Players may feel free to ignore this if they so wish. Be aware, that being discovered to be travelling through someone else’s lands without permission may be seen as a seditious act and could lead to a Player's execution as a spy!
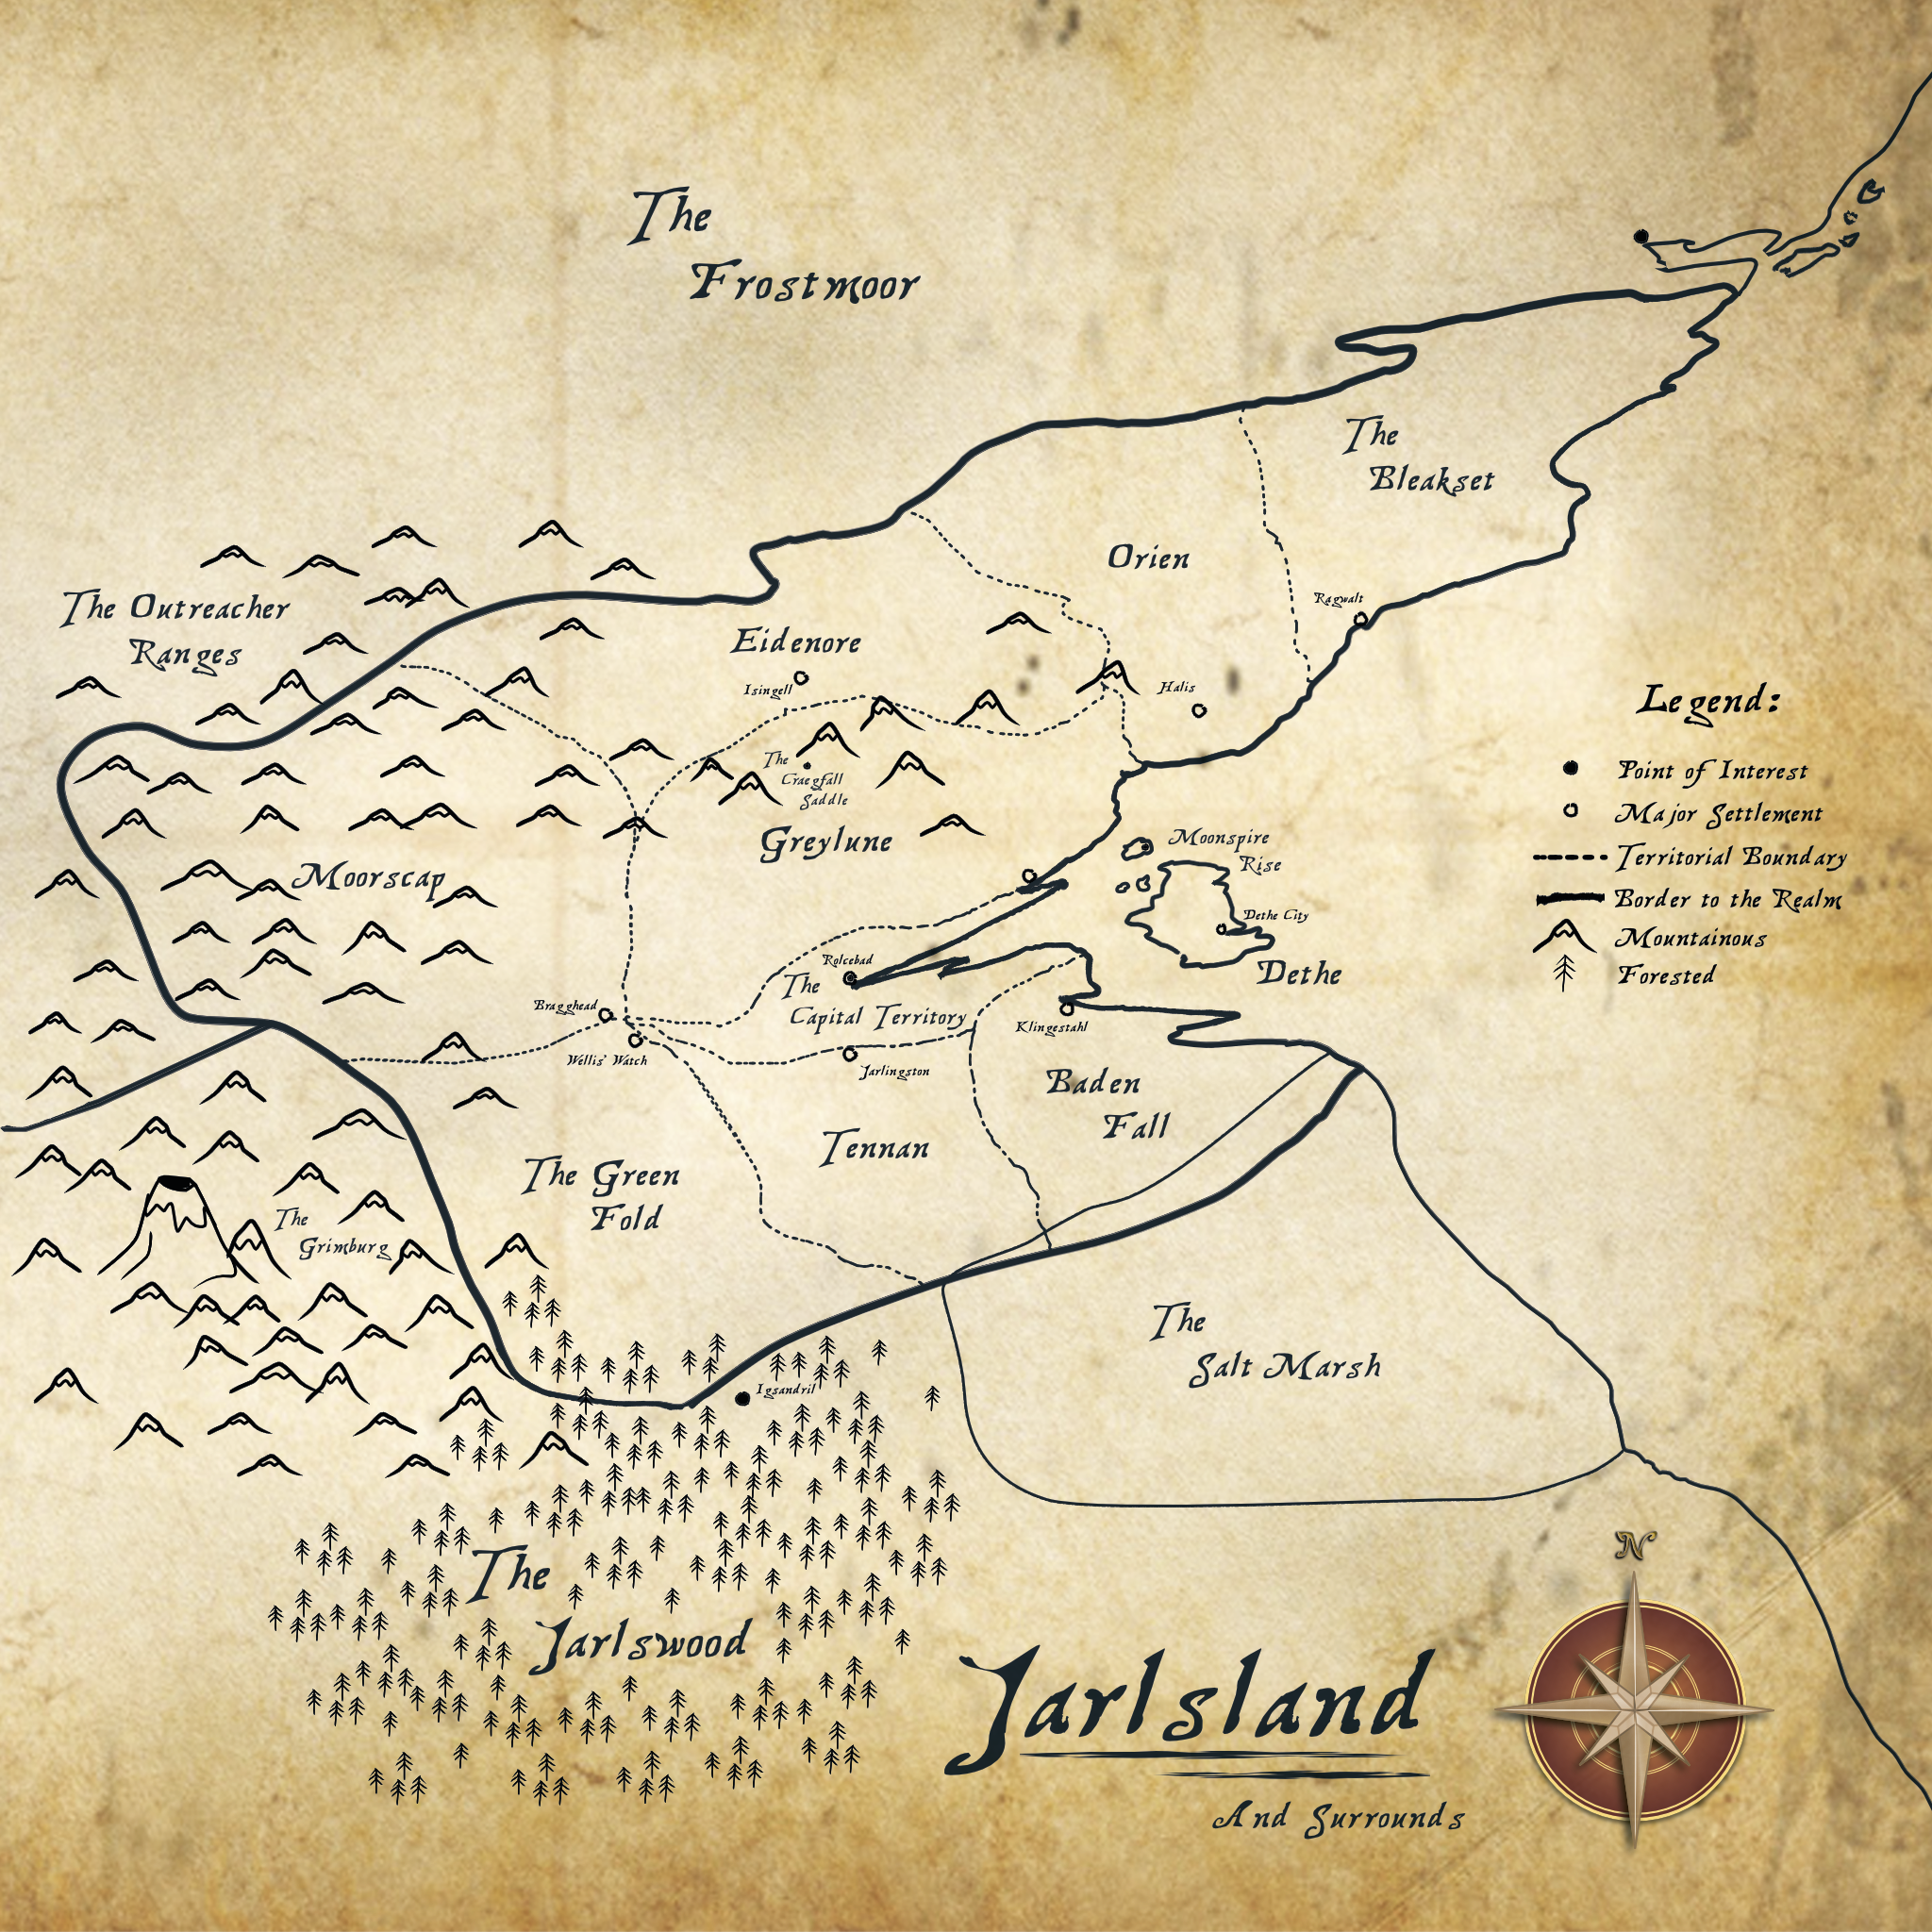
🗺️ Maps
👂 Lore Stones:
It is said that across the land, these ancient stones listen to the world, recounting tales from nature and song, in kind, since the dawn of the current era. Though some may only recount the pleasing babble of a meandering river, others are said to have captured the heart songs of the very people who dwell this cursed land. Perhaps, one of these monoliths of history may recount the information our coven wishes to know? What of our sister’s betrayal? What of the heir? Indeed, knowledge may prove to be our greatest weapon in this, the midnight of our perpetude.
The Lore Stones are scattered across Jarlsland in the form of ‘Points of Interest.’ A talking stone that collects the stories of the land since primordial times that can tell anyone who takes the time to listen, in veiled or fragmented verse, the tales not spoken aloud by any now living. A random number of these stones will be known to the Coven Team at the start of the game but these will not be a comprehensive list, and may not be in a sequence of any use. It is up to the Player to discover the Lore Stones, if they so desire, and to decipher the messages they could contain. Be warned, however that other Players may stumble across these stones too, and once a stone has spoken its tale it could be centuries before it speaks again.
⛰️ Territories, Regions and Points of Interest -
Territories -
Territories are the larger organisational unit for locations in Jarlsland. They consist of the lands claimed by each governor or noble house. Each House begins the game in their home territory that consists of four regions, one for each Player in that team. In addition, there are several unclaimed territories on the map of Jarlsland which haven’t yet been explored. When filling out their travel papers, Players can specify only a territory at minimum for their location in a round. This would be a risky move however, because any effect, that targets the listed territory, may be assumed to affect the Player as well, for good or ill. This ambiguity can work in both the Player’s interest or not, depending on the game-state that round.
Regions -
Each territory is divided into several regions that are the delineations which Players administer directly and battle for control over. Each House will start in possession of their home territory which is divided into four regions, each of which is administered by one Player at the start of the game. Regions are the delineation which Players can attack directly to contest possession. Some actions can only be undertaken by a House, in a region, if they are in control of it at the start of the round. Player’s characters can also travel directly to a region specifically, indicating the territory and the target region on their travel papers.
A full list of predetermined ‘regions’ that can be travelled to is included in this handbook but keep in mind that discovery is part of the Player’s game. It is intuitive that the settled regions will be known to all Players, but other locations will not immediately be apparent and specifics about other territories may be limited without research or further exploration. Most common regions will be marked on the main map in each War Council. Other regions will not be marked and have to be discovered in order for Players to know how to travel there.
Points of Interest and Transient Locations -
Some regions also have sub-locations that can be specified by the Player when travelling, if they so choose/know to do so. These are called ‘Points of Interest’ and may consist of anything from an entire town, all the way down to a specific building or monument of importance. Points of interest may also be generated during the course of play due to events affecting the narrative. For instance, if a network of tunnels is discovered under a city, previously unknown to the ruling House, this would be considered a separate ‘Point of Interest’ to the region that it exists in, for the purposes of locations and travel. However; to travel there, a Player would have to know about it and put it on their papers for that round.
In the course of play if a Player specifies a location that doesn’t exist (or doesn’t exist anymore) on their travel papers for that round, then Control will either interpret the outcome of attempting that transit, or push the Player into an adjacent region for that round.
Baba’s House -
The Babayaga’s ambulatory house on chicken legs moves around the map during the course of the game. Counting as a mobile Point of Interest, her house will move, region by region, once every round. With few exceptions, effects targeting the Babayaga’s house must target it directly. If the effect lists the current region and the Baba’s house then it is considered valid. If, however, the target names the Baba’s house with no region, the effect may fail. Conversely, if the effect lists the wrong region and also Baba’s house, it will certainly fail. The same rules apply to regular travel papers and regions if something else were to occur that moves a Point of Interest. If the Player wishes to address the Baba in person, on her sufferance, they may attend her kitchen table court during the round without their character having to travel there on their papers, that round. Player’s who do this can list a separate travel location for their location at the beginning of the round, as the visit to Baba is interpreted to have happened some other time, during the current week/round.
🏜️ Named Starting Territories and Regions -
The Capital Territory – Rolcebad City, House Raieth and the Tribunate.
Regions -
▪   Rockpoint
▪   Overlook
▪   Castingstone
▪   Marshrun
The Badenfall – Central Territory – Klingestahl City, House Garvin
Regions -
▪ Baden’s Bluff
▪ Scallywag's Reach
▪ Vebron
▪ D'lyth
Greylune – Central Territory – Felderbahn City, House Teff
Regions -
▪ Granary March
▪ Golden Spir
▪ Bagrik
▪ Henua's Land
Moorscap - Northern Territory – Bragghead City, House Baffen
Regions -
▪ The Deeping Vale
▪ Kraz Point
▪ Bellower's Folly
▪ Ehrune
Eidenor – Northern Territory – Isingell City, House Ferrith
Regions -
▪ Lake Tibus
▪ Fulcrux
▪ The Redward
▪ Quirrus
The Bleakset – Outer Territory – Raggwalt City, House Krebb
Regions -
▪ The Obis Plains
▪ Nearpoint
▪ Lebrin
▪ Clear Gap
Orien – Northern Territory – Halis City, House Draeger
Regions -
▪ Webber
▪ Deadrip
▪ Corlog
▪ Greyburn
The Green Fold – Outer Territory – Wellis’ Watch, House Samvid
Regions -
▪ The Wyrian Step
▪ Hightop
▪ The Ringwald
▪ Eihnbes
Tenann – Central Territory – Jarlingston, House Theddis
Regions -
▪ Jarlsgrave
▪ Tirem
▪ Vengence
▪ Shearstow
Dethe – City State and Outer Territory – The Varrik Clan
Regions -
▪ Baneblood
▪ Skypoint
▪ Nightbale
▪ Ironhorse
🌁 Fog of War -
In a game of Babayaga there is no way for any one Player to confirm, beyond a shadow of a doubt the actions and whereabouts of another Player. Through guile and gambits they may be able to infer this information but the only absolute confirmation will be in hindsight. Unless, that is, if someone has been told by the Player in question truthfully. The Player should trust carefully and conceal their own location whenever possible. An exception to this fog of war is when the Player character attends a battle in person. But even then, a handshake agreement may prove to have been a ruse. If a House agrees to ally with another for an upcoming battle, but then each Player travels somewhere completely different when the time comes, it may have narrative consequences. Not to mention, the diegetic response from the teams, who may feel like they were betrayed.
🛡️ Map Rooms and Councils
Each major alliance starts with access to a War Council, in a Map Room, and every Player House starts allied with a particular alliance. For the purposes of travel, the Map Room of each major faction is said to meet in the current capital city of the occupying alliance. If no such place exists but a War Council is claimed by a faction, they must establish a Point of Interest on the map for their council to convene and then communicate that location to Control.
At the start of the game these established Councils are located in Rolcebad, for the Loyalists, and Jarlingston for the Volchenks Union, though this will likely change throughout play. The main map, which will dominate each of these spaces, is explicitly not a ‘war map’ or mechanically relevant ‘board’ in the traditional sense. This is not a place for Players to get the ‘status’ of the game, or move miniatures to simulate battles; This is a map. The main map will be the most detailed map in the game and contain some, but not all of the starting region names. Only factions able to claim a Map Room will have access to such a map and the greatest advantage of having access to one is ‘context.’
The Map Room is a place for planning. Each side of the main conflict will have one and it will be the central location for these alliances to meet and scheme, when the councils are called. If another faction of note develops during play, they can call for the establishment of a new War Council. A new alliance must be composed of members from at least three Houses or other powerful entities. If both Map Room tables from the beginning layout are currently occupied by major factions, they can create their own map room, Control will have resources to accommodate this if required. In addition, a Faction can claim an existing Map Room for their War Council if the currently occupying faction is no longer larger than the faction making the claim. (Note; this rule is more of an administrative restriction to make sure that larger groups in the game always have access to enough game resources. It is not designed as a diegetic punishment for the exiting alliance and does not mechanically affect them beyond the ‘loss in standing’ that it would represent symbolically.)
The resources available at the Map Rooms will generally not be allowed to leave the Map Room tables. This causes holding one of these rooms to be of strategic benefit to any faction who can maintain it, with no game mechanics being intrinsically tied to them. Whether an alliance is influential enough to establish or overtake one of these tables is at the discretion of the Control team. At the Map Room tables, the Players can place tokens and plan using the central map of Jarlsland there, but it does not and will not represent the pure state of the game. The maps are merely meant as a tool to help represent the Player’s current understanding of events in the game, as recorded by their alliance. Players may choose to denote the movement of armies, place banners in Regions in order to track which Houses they believe are in control that round, or plan future coordinated movements. They may even try to track Baba’s House as it moves about the country, and interpret her movements. What needs to be remembered is that what is on the map is based in the information each alliance or team has provided for themselves, Control will not be updating these map rooms for the Players.
Players are also cautioned not to leave ‘telling’ information on their map between rounds as there may be unscrupulous sorts about, spies for one adversary or another. It is not against the rules to collect information in this way, or to present disinformation in order to counter such skullduggery either.
At the start of the Civil War, the two lead Houses are House Raieth for the Iron Watch faction and House Theddis for the Volchenks Concord. However, if one or both Houses fail to maintain the support of their other Banner Houses, they may either lose their leadership position in that respective alliance, or, depending on the cohesion of the other Player Houses, their alliances could dissolve entirely. Their Map Room, in such a case, would be taken over by the next strongest alliance or left empty until a time when one emerges. In the event of conflict over who currently occupies any Map Room, the Control team will have sole discretion to determine the outcome.
🎲 Gambits -
The main way that Players can affect the game world, not through combat or coalition buiilding, is through ‘Gambits.’ When a Player wishes to ‘do something’ in a round, in addition to submitting their ‘travel papers’ to Control, they can also fill out a Gambit letter. A Gambit is an additional submission that can have on it the questions; Who? What? When? Where? Why? And How?
Players can fill out any section that they like and no section is mandatory. However, the more information that the Player provides, the more likely they are to get a specific result. Gambits do not guarantee that what has been asked for will happen, they only lay out a Player’s intention for the following round.
Players do not have to fill out their Gambit at the same time as their travel papers but they do have to have submitted their travel papers before Control will be able to validate any actions submitted as a Gambit. This is because the Player’s character location may become important to that Gambit, or another Player's Gambit, when it comes to determining success, failure or another outcome entirely. A Gambit will be viewed to resolve after the Player character has travelled to their chosen location for that round, and will be applied in the folllowing round.
Both submissions (Travel Papers and Gambits) must be accepted by Control before the ‘High Noon’ phase, each round, if the Player intends to enact a Gambit in the proceeding round. This means that it is important for a Player to think ahead about what they are meaning to accomplish overall, not just round by round. Players do not have to submit a Gambit in a round if they do not wish to. Players may submit multiple Gambits in a round, if they have time to do so.
Infamy and Renown -
Infamy and Renown are personal resources that each Player will collect during the game. (See more in the named section, later in the Handbook.) When submitting a Gambit the Player may attempt to influence the result of their submission by using either their Renown or Infamy resource, submitted along with the Gambit, to tip the scales in their favour. When opposed in their actions, this could mean the difference between success and failure, but be warned; Disbalancing too far toward either Renown or Infamy can have other consequences and the Player is advised only to do so when absolutely necessary.
For instance, a common use of Renown when initiating a Gambit is to help turn an enemy's region which is in turmoil to another Player's own banner without resorting to bloodshed. Infamy in turn can help the region in question determine who it is that they truely fear the most...
Interpretation -
The Control Team will interpret Player Gambits literally. If the execution of a Gambit becomes impossible or pointless during the round, Control will attempt to apply the Gambit anyway, and interpret a result. Players will not get a report on the outcome of their Gambits, the game state will simply change to accommodate the result, if any. If the Gambit was subtle, the Player should not expect to hear about the result unless they go out of their way to find that information. This means that a Player should outline clearly the results and intention for their Gambit. If left up to interpretation, Control will interpret. This might also work in the Player’s favour as a declarative Gambit may succeed or fail, whereas an open ended Gambit may apply to more situations. The Player should, therefore, think carefully when phrasing their Gambits!
‘Verbal’ only gambits will not be accepted by Control but Players can feel free to ask a Control Team member before filling out their Gambit in order to get a sense of how applicable it is. Nothing that is consulted in this fashion should be considered a promise from Control that it will happen however, as the Gambit itself exists in the context of all other actions in the game and may be modified or entirely discarded, depending on what else is going on. No Gambits will be accepted if they fail to follow the; "Who? What? When? Where? Why? And How?" format.
Upon request, a Control team member can help write out a Gambit (or any other forms like travel papers) for a Player to accommodate accessibility reasons. It is asked that Players, please only rely on this assistance at requirement and give plenty of notice if they think that they will need this type of assistance during the game.
🌹 Bloodlines and Heraldry -
A Player’s House is their team for the purposes of the game. The House will have a coat of arms that binds them together as one arm of the aristocracy or one of a new money Houses in Jarlsland. Each individual Player will also have their own heraldry represented by their Table Banner. This is the unique pattern that each Player will be given that acknowledges their House, denoting their particular family line. Bloodlines, in Babayaga are tracked on a House’s family tree. Each team will have one, placing themselves in that hierarchy at the start of the game.
The family tree is important, as it will show how close any one individual is to the Tribunate by birth but also their relationship to eachother. If the Babayaga is to be believed, somewhere, there is another, secret heraldry that shows the true order of succession, all the way from the first Jarl. Perhaps Players could work together to discover it?
✊ Controlling Regions -
Each Player in the game has a home region within their team’s Territory at the start of the game. These holdings are mentioned in the Player Briefings and can be marked in the map room if required. For each region controlled or acquired, a Player will receive a ‘sword token,’ indicating the region’s submission to their rule. They will also receive a new Table Banner in their livery which they may use in conflict.
Additional banners represent troops, being levied from captured regions. If a region is taken, either through politics or battle, the possessing player must transfer their sword token for that region to the new owner and divest the table banner that it provided them. Players should always remember that this is a game of maps and lineage not of war, but conflict can be a useful tool towards those each of those ends. If Players fail to keep track of their possessions, they could find themselves made vulnerable or with other players taking advantage.
⛳️ Table Banners -
Each Player starts the game with one ‘home’ table banner. The Player’s home region banner denotes their loyalist forces, from their starting region. The heraldry on the banner marks the Player’s house and bloodline. Table Banners are used in game terms to show the allegiance of each noble to the leader of their alliance and to any faction or another by its placement around the room. Each banner also represents the military forces raised from a region for the purposes of conflict. A Player may switch allegiances throughout the game, but their banner will never be controlled by another Player directly.
If a Player ever, overtly, changes their allegiance, they can move their banner, or banners to the appropriate alliance, indicating their support. Banners for each alliance should be kept at their appropriate Map Rooms or rogue council, if the owning Player is a part of that alliance. There are no rules that say that the Player must place their banner with their alliance, however, they should keep in mind that the placement of their banner could be interpreted as a statement by other factions. Any Player that declares for another alliance can indicate that through the movement of their table banner to their new alliance’s base of operations. This includes for the Babayaga’s apprentices. In that case particularly, the Baba has no heraldry of her own, but the table banners of her hostages must be placed in her court and may only be used in conflict upon her direct approval.
Players may dissemble about their actual loyalty in the game, but teams and alliances are free to reject support from any table banner owned by a Player or drawn from Regions suspected of duplicity. It is essential for Players to maintain their reputation for trustworthiness in order to avoid isolation, even if their intentions are truly duplicitous.
🤝 Alliances -
The game begins with three key alliances; The Iron Watch, The Volchenks Union, and Baba herself with her apprentices. These are not static bodies, each Player can choose any other House, alliance, or Player to support with their banner and can move allegiances any time that they like (with the exception of Baba’s hostages...ahem, apprentices.) The house with the most influence in an alliance is called the ‘Lead House’ and chooses the rank order and subsequent influence of each of the Houses supporting them.
New alliances can be made and old abandoned. The two largest alliances in any round may claim each, one of the main Map Rooms as their War Council and place their supporting banners there. Houses or PLayers can also choose not to support any alliance at all, however, doing so weakens their standing and could leave them vulnerable to attack. Alliances are free to create any kind of charter or membership rules that must be adhered to and Lead Houses may reject any applicants to their alliance upon their own discretion.
Coalition building can lead a House to greater strength than they could hope to achieve on their own, but each individual Player must be realistic about if there is any scope for vertical movement if the status quo is not disrupted.
♦ Starting Factions -
At the beginning of the game, all Player Houses are formed up, having established their loyalties as they head into the brewing Jarlsland Civil War. On one side, ‘The Covenant of the Iron Watch’ stands with the incumbent Tribune in Rolcebad. Opposed to them stand the Rebel forces, and instigators of the current turmoil, The Volchenks Union who back the Governor in Tennan and their blood claim to the Tribunate. House teams will also have their own agenda, with reasons to support their side being stronger or weaker depending on what they expect to receive should they be victorious. Players should always remember that Babayaga is a game about diplomacy, as much as it is about conflict and a well timed olive branch may secure even a better outcome than winning the war itself, if negotiated correctly.
The Covenant of the Iron Watch
Ready to defend the current regime against the upstart rebels led by the pretender in Tennan, the Covenant is an alliance born more from convenience and loyalty than any true political movement. The Houses that make up the Covenant are wealthy and have a vested interest in things going on as they always have. Complaints of favouritism and wealth disparity fall on deaf ears for the most part, and for those who have signed the Covenant, the prevailing opinion is that there were other vectors through which to air these petty grievances beyond full scale conflict. The Covenant sees the Rebel Houses as petulant and reactionary. They are, for the most part, keen to show those traitor territories the true power of their current empire and it is widely thought that with a short, sharp lesson, the rebels will see their error and fall back into line quickly. It really is only the pretender to the crown who has stoked the revolutionary fervour, and with their death, things will likely go back to the way they always have been.
Houses of the Covenant
House Raieth of The Capital Territory
House Raieth hold the family name of the original Jarl, their eponymous progenitor and leader, responsible for the establishment of Jarlsland. After arriving in their lands, by ship, over five centuries before, the Jarl established dominion over the lands now known as the Jarlsland Tribunate. Since that time House Raieth have presided over the entire Tribunate from their capital city in Rolcebad, which sits on the mouth to the river Eiunge. All other houses are said to be branches of that original family, friends and benefactors of the first Jarl. It was that leader who is also said to have, on his own beneficence, seen fit to gift the various lands and territories which each other House now hold and which form the rest of the empire through their fealty to the descendants of the Jarl.
The Tribune, by convention gives the other Governors a relatively free hand to manage their own affairs but a tithe, later taxation, has always been required by House Raieth of the other Houses. House Raieth is at the centre of the current rebellion by the outer territories, not only due to the question of their true lineage from the Jarl, but also through their apparent propensity to tax the outer territories at a higher rate than those who are at the centre and in greater standing with the Tribune. This favouritism has never been proven, however, and House Raieth will always claim that any discrepancy in revenue is proportional, based on population and production per head in the less developed Territories. What this really means and how proportional taxation seems to work has never been clearly outlined by the capital’s Ministry of Revenue.
House Garvin of Badenfall
House Garvin, ruling family of the most southerly territory in Jarlsland is the founding House of the Covenant for the Iron Watch, the Iron Watch being described by the House, originally as the last line of defence between civilisation and barbarism. Curiously Badenfall was, until recently classed as a borderline, outer-territory and had strong ties to the Tennan and their Governor, who is now a pretender to the throne. House Garvin was also one of the most outspoken Houses against proportional taxation, feeling slighted by their distancing from the capital and being classed along with those affected by the program. Many expected House Garvin and Badenfall to be amongst the first signatories of the Volchenks Union but would later refuse to attend the rebel congress when it was signed. House Garvin would instead later agitate for the creation of the Covenant in opposition to the Rebels and in doing so carved for themselves a leadership role that cemented their position as a central territory, and first in favour to the Tribunate. How or why Badenfall followed that course, in opposition to expectation, is a mystery to most and the true motivation is known only to the decision makers in House Garvin.
House Teff of Greylune
House Teff are one of but not the richest House outside of the capital and hold one of the largest territorial claims of all the Houses in Jarlsland. A true central territory, Greylune is infamous for both it’s industry and high levels of personal wealth among it’s middle and upper classes. Comprising most of the northern step region out to directly above the Rayleigh Delta and the Capital Territory, Greylune is some of the most temperate and livable land in all of Jarlsland. Having first made their wealth on largess from the capital and then later by supplying the northern expansion into the territories of Eidenor and Orien, House Teff made some key, early choices that have led them to immense comfort and positioning within the Tribunate. This bounty was not entirely based in luck and cunning, however, as it is said that the first Governor of House Teff was in fact the Jarl’s sibling and received much of the fledgling nation's wealth while the original Jarl was still alive.
Greylune’s recent, generational shift into manufacturing as its industrial base has had some contributing effects in the other northern territories which House Teff first helped to seed. Specifically, much of the farmlands that used to feed the north have been paved over or given to other crops, mining, and industry. It is said that the tension between these territories over food availability was one of the fomenting catalysts for the rebellion, though many in House Teff deny the fact openly.
House Teff joined the Covenant more as a formality, after the Rebels in Orien started to raid Greylune’s northern regions for food and supplies. With House Teff seeking legitimacy for the austerity measures which they have imposed towards the northern Houses, they claim it has become necessary in order to defend their own citizens from the same privations seen to the north.
House Baffin of Moorscap
House Baffin is truly an outer territory in all but status, being the most westerly territory in the Tribunate. House Baffin, however, are traditionally staunch monarchists and have not suffered so blatantly under the current Tribune’s, proportional taxation. Mountainous and remote this territory is less interested in politics and knows full well the breadth of other troubles that face the people of Jarlsland from both inside and beyond. To Baffin, all other Houses seem eager to face inward alone, focused on their own bickering and bloviating rhetoric. Alongside the rebellious territory of The Greenfold, Moorscap stands vigil in their mountain holds, defending the western boundary of the kingdom, silently, from dark infiltrations of unknown threats, too nightmarish to mention in polite company. House Baffin signed the Covenant as a way to ensure that supplies were still available to them as the country descended into what they view as a misguided and damaging conflict.
House Ferrith of Eidenor
House Ferrith are of hardy stock. Eidenor sits on the far side of the Craegfall Saddle, an often snowed over pass allowing passage from Greylune, into the eastern fingers of The Outreacher Ranges. House Ferrith is said to be the lucky House, though this is not always meant in a complimentary way. The House’s progenitor is famously unrelated to the true Jarl’s bloodline setting them to be viewed, by some, as lesser amongst the aristocracy. The appointment of one of the Jarl’s servants to the position of territorial governor was a scandal at the time, and the echos of that disruption are felt to this day, though often forgotten for how remote their House is to the goings on of the court in Rolcebad. It is an ongoing mystery amongst the other Houses, what deed led one such as the founder of House Ferrith to receive such an ennobling gift, but in the centuries since the Ferrith have proven themselves as a true power in the north, in possession of one of the smallest, but most adept professional armies within the Tribunate.
House Ferrith, though usually seen as loyalist, mainly due to the scale of their perceived debt to House Raieth are, in point of fact, practical to a fault. The Ferrith signed the Covenant, not out of any true, lingering sense of debt to their monarch but from a responsibility to their own people who would suffer even more hardship, should the pass at the Craegfall Saddle be closed to them. Indeed, the ongoing privations have somewhat soured the loyalist cause in Eidenor. In reality the northern territory is more of a country onto itself and powerful in its own right. Isolated from its neighbours and the sea as they are, House Ferrith will do nothing to endanger their standing with the Tribunate, but are also disinterested in policing the comings and going of armies along their border, intent on wasting precious supplies in pointless skirmishes. Given the option and good relations with the other territories in the north, there would be nothing truly compelling Eidenor to maintain their position within the Iron Watch.
The Volchenks Union -
Comprised of the dissatisfied Houses of Jarlsland, the Union have vowed to supplant the sitting Tribune and replace them with the true heir to that seat, the Governor of Tennan and leader of House Theddis. The Governor’s claim is bolstered by writings, found recently, and supposedly penned by the hand of the original Jarl. The letters are purported to claim that not only is House Theddis the true lineage of the Jarl but that the current House Raieth have long ago usurped the crown and perverted the true intentions or their country’s leader.
Many Houses of the Union have publicly accepted this version of events, though it is true that most of the Houses in open rebellion are doing so for more local, practical and financial reasons. With hardship in the north, the threats from the east, unfair taxation and a general want for change, the Volchenks Union seeks to bring about a new age for Jarlsland and a more fair and equitable future. The strength to which each House holds to these values is for their own council to keep. The Union itself is named after the town of Volchenks, that was unfairly destroyed by a group of mercenaries working under the auspice of the Tribune, in order to collect overdue taxes. The Union decree itself is said to have been signed with ash from the bones of the town’s residents who were burned in their homes for failure to pay. The Volchenks Union has seen a groundswell of military enlistment and has attracted popular support in many territories for their apparent vengeance agenda, a goal which speaks more favourably to those of the lower classes than any high minded notions of politics and primogeniture. Though the Houses, signatory to the Union Decree, are largely separated across the breadth of Jarlsland, they have found their ability to coordinate comparatively unhindered due to this broad support, even throughout the central territories themselves.
House Krebb of The Bleakset
House Krebb and their territory are the most northern territory of the realm that still have access to the sea. A maritime culture has seen their population largely keep to the ocean side, relying on seatrade (that not controlled by Clan Varrik) and fishing for their prosperity. The Bleakset is one of the least populous territories but has suffered some of the worst privations of the north, stuck as they are between the antagonistic Orien and an unforgiving sea, that seas its waters frozen over for the majority of the year. The proportional taxation laws have also seen House Krebb squeezed harder than most, and even through their preexisting ties to Orien, they have been increasingly limited in access to the bounty of the rest of the country via the punitive trade policies in Greylune and guilt by association. House Krebb heard about the massacre in Volchenks long after the fact but saw in it the kind of change in headwind that meant if they weren’t out in front of it, they too may be similarly crushed. House Krebb was a late but enthusiastic signatory to the Union Decree, seeing an immediate benefit from the emerging industry of letters of mark for privateers, and the bounteous spoils such adventures could bring back to The Bleak Set's frost covered ports.
House Draeger in Orien
House Draeger has been the problem child in Jarlsland since their establishment as a breakaway territory of Greylune, during the original Jarl’s lifetime. Orien’s progenitor was said to be a very close relative of the Jarl who made it their mission to keep the emerging dictator honest throughout the foundation of Jarlsland and the Tribunate. It is said that the Draeger family branch has kept that spirit very much alive in the proceeding centuries, taking obstinate defiance to new and unprecedented art form. Positioning themselves as the opposition on any matter of state that required consensus, the Draegers were the hammer to the Tribune’s anvil. A position both parties traditionally appreciated but has led to bad blood in the Capital of late. Naturally, when the Union Decree was signed, the Draeger of Orien were first at the front of the line. House Draeger was the first signature to follow that of the claimant Tribune on the decree and the territory has done everything in their power to follow through. Orien has provided the most soldiers, the most resources, and has suffered the greatest casualties in the opening skirmishes of the rebellion, even over Tennan, and with their only complaint so far having been that the other signatories should be following their lead in doing so.
House Draeger might have had the temperament of a rebel from the start, but their secession was far from guaranteed. Sealing the deal for them was the long running grain embargoes and other trade restrictions placed upon the northern territories by Greylune, as well as the privations which followed. Orien, having been originally broken from a greater Greylune territory always maintained a particular rivalry with their southern neighbours. Jockeying for influence and primacy was nothing new. But when the more recent, and particularly strong, trade embargoes lead to the Capital Territory following suit, with the intent to enforce their proportional taxation laws, it was a feather fall that broke the dam. To a great extent, Orien and House Draeger were already close to open rebellion by the time of the raising in Volchenks, and to the noble family there, signing the Union Decree was all but a formality. House Draeger is less concerned with what the Tribunate looks like in the wake of the rebellion, only caring that its better than what they have now.
House Samvid of The Green Fold
The Green Fold is both a true frontier and the breadbasket of southern Jarlsland. House Samvid, in turn, reflects that duality in both their reputation as iron blooded centurions to the west and mercantile savants to the east. Unlike Moorscap, the other frontier territory, The Green Fold has a large, dispersed population who are each able to own the lands upon which they reside. With every family presiding over their own lands and large villa estates, managing their own affairs, and generally keeping their business, just so; House Samvid spend trivially little of their time in a managerial, or punitive mode. Where other noble houses spend their time counting taxes and raising militias, Samvid have always found a much easier course to prosperity through the lubrication of commerce in their lands. By offering their comparatively rich populace a free hand and some reasonably subsidised civic and logistical services, House Samvid has built up a generational treasury to rival that of even the Capital. That is not to say that the Green Folders are without threat, however; And as a part of the agreements made to the people of The Green Fold, each family must send their young adult members for a period of territorial service in The Pathfinder’s Guild. The Pathfinders guard the western border of The Green Fold from anything, or anyone who may take the mind to entering Jarlsland through the twisted bows of the continent’s largest forest. Officially this is a moot precaution, satisfying the requirements of an easy life without heavy taxation, but ask any Pathfinder who served and it becomes clear that the cost is well paid for some, and others may never return from that wall of tangled green.
This being the ancient agreement between the Samvids and their citizens, the punitive application of the Capital’s proportional taxation laws fell flat on the ears of those for whom revenue, traditionally, only flowed one way. If that wasn’t enough for them to sign the Union Decree, The Green Fold would see the time for a new Tribune in Rolcebad as an opportunity for their grievances to be aired, under the auspice of a leader who better knows the problems that they face in the south. The Green Folders see Tennan as a generally soft territory, with neither the callouses of a bow or the honed rhetoric of commerce lending them favour. But if that is the option available to them, they’ll take the erstwhile Governor in Jarlingston over another northerner any day. Heraldry for the Green Folder’s, after all, is just a matter of formality. All that really matters is the next fletching or stroke of the quill.
House Theddis of Tennan
For the nobles of House Theddis, the question of which House, truly, calls claim to the throne is Rolcebad is the wrong question entirely. Though the palace sits proudly atop the Noonberg, overlooking the river Eiunge, and ‘supposed’ first court of the Jarl in Jarlsland; The Jarl is said never to have even looked back once pronouncing their new nation into being. The Jarl is claimed instead to have swiftly followed the smaller rivers, upstream and straight inland, into the glorious bounty of the region which would become Tennan itself. Jarlingston, the Capital of that territory would become the home seat of the Jarl’s court for the remainder of that tenure, with the Noonberg resembling nothing more than a traditional place of gathering amongst the territorial Governors, used for various ceremonies after the Jarl’s death. Indeed the Jarl is said to have hated the place, demanding it be kept bare of anything useful for the remainder of their nation’s history. The palace, a later addition is often justified as a way of ensuring that wish be observed. But House Theddis (and others) claim that this is a convenient misinterpretation of the instruction. That is, in holding the mound itself as some sacred or other nonsense that tends to come up around these stories. Of Tennan itself, the territory would act as the capital until the establishment of the Capital Territory in the time of the Jarl’s grandchildren, and has always claimed the spiritual leadership role despite the mechanics of the state that grew up around it.
Officially House Theddis drafted the Volchenks Union Decree in order to avenge the raising of the town of Volchenks by Central Territory forces. This was as well as to enforce the abolishing of proportional taxation in the territories. Secondarily, of course, this outrage proved fertile ground for a new claim, discovered long ago and only revealed to the people of Jarlsland recently; That the Raieths were not the true claimants to the Tribunate throne and that, beyond this, their ancestors had stolen leadership of Jarlsand away from Tennan through guile and trickery. For evidence the Theddis show a letter penned in the Jarl’s own hand which mentions them by name and calls for the capital of the nation to forever be centred upon Jarlingston. The latter being a city which the Jarl built and within which they were later entombed. House Theddis have cast the nation into turmoil with these claims and though they extol the truthfulness of their assertions, one thing is true beyond a shadow of a doubt; Jarlsand will never be the same.
The Varrik Clan of Dethe
The founding of the City State of Dethe was, depending upon who you ask, either a masterstroke in realpolitik, or a complete, bumbling accident. When the Jarl’s fleet first arrived from the sea, Dethe was the first landmass to hove into view. Crossing the eastern seas was nothing short of miraculous, and the sight of land after such a perilous journey was one that many would claim as the most beautiful they had ever seen. The fact that the island was almost entirely girt by impassable rocks and shear cliff faces would soon dampen that view for many aboard the Jarl’s longships, but a great majority still savoured their hope, at being no longer adrift on the unforgiving ocean and at the mercy of the waves. After circumnavigating the island, the fleet was finally able to anchor in the somewhat sheltered but still treacherous “Bay of Mourning,” on the West side of the island. Unbeknowns to the crews at that time, they were only another day’s sail from the land mass that would later become Jarlsland actual. It was impossible for the fleet to know that, however, and many were scarce enthused with the prospect of leaving their, admittedly bleak and savage, saviour behind. That is, to once again sail off into the unknown. The first hand records are incomplete from that journey but what is true without a doubt is that some of the fleet, with the Jarl, sailed on and others, led by the ancestors of The Varrik Clan, did not.
In the current time, Clan Varrik is a power onto their own and honorarily given the respect due any other noble House with a Territorial Governorship. That deference is due to a long standing trade pact between the two nations, a lifeline that bolstered the adventurous part of the fleet as they tried to establish themselves in their new home. With bountiful resources, despite their isolation and bad weather, Clan Varrik was able to quickly build for their island a robust maritime tradition. Though this came at the expense of the forests that once covered Dethe, they still hold a vast majority of the trade contracts throughout the territories that border the Herring Bait Sea and along the Rethied estuary where the river Eiunge gives way. With the largest commercial fleet in all of Jarlsland, Dethe is the unofficial master of maritime trade in all the Tribunate. Clan Varrik, by their own assertions, are neutral in the brewing conflict on the mainland. Their neutrality is largely practical, with the Varrik holding no real enmity toward either side. Though, as with all things, the facade is beginning to slip. With Baden Fall seemingly intent on overtaking their trade, garnering favour with the Capital, and generally increasing their activity around the islands, things are becoming less certain or simple. The Capital has no reason to hold to their ancient contracts, seeing in the Varrik no method of taxation beyond annexation. On top of this, with The Bleakset increasingly relying on what amounts to piracy in order to sustain itself, Clan Varrik have begun to make overtures towards the Union and Tennan. Perhaps they will see more value in a future collaboration where the current Tribune does not?
🔋 Influence -
All House banners will be ranked for influence by the lead House in their alliance. By default the order of influence in the alliance is chosen by the lead House of that alliance at the start of the game and onward through any changes to their membership or favour. The lead House has the discretion to change this order in their alliance at any time, which is usually represented by the line order of the alliance's table banners by proximity to the lead House's own banner when placed at their War Council. When ordering banners, those ordered most distant from the alliance's lead banner, (That is; the highest ranked player in the Lead House) when forming a council, have the least influence in that alliance. The lead House of an alliance is determined by support from the other members of the alliance. The Lead House then decides the order of each of the Houses below them, based on privilege, power, or whim. A council may not proceed in a round until this order is established.
At the beginning of the game House Raieth for the Loyalist Trust and House Fedis for the Union, will be the lead Houses of those factions, as they are the initial claimants to the throne and Tribunate. The Governor (or, Lead) Player in each of these Houses start the game with two table banners over the other Player’s initial, one for their home regions. This is a one time starting bonus which stops if those Players ever lose primacy in their respective factions and cannot be reclaimed even if they regain that position later. Further into the game, teams may choose to support a different House or Player for leadership, or they could choose to break away entirely.
The Babayaga can resolve her preferences for initiative order as she so wishes, usually playing a shell game of priority and punishment amongst her acolytes, as they are seen more as individuals, distinct from their Houses while under the Baba’s roof.
Influence in an alliance is normally assigned, House by House, not Player by Player. That being said, there is nothing stopping a particular Player from breaking away and declaring for a different House. The number of banners in a particular House in the alliance will affect that faction’s initiative in conflict but does not affect their standing within an alliance. To make it clear; the lead House has carte blanche to decide the alliance's influence order, regardless of force distribution or numbers of banners owned by the subordinate Houses. If a Player or House doesn’t like where they sit in the influence order of their alliance, well; That is where politics comes in.
Houses may also send different members to different councils to which they are invited, however; The optics of this can be complex and a House leader should be very confident in the loyalty of their own family if they choose to empower another member of their House in such a way.
Mechanically, influence order primarily determines the order by which Gambits will be resolved. If two Gambits conflict within an alliance, then the Gambit of the House with more influence will be prioritised. The alliance with more Houses, not banners, overall will gain priority in a case where any gambit may conflict between two alliances. Alliances with the same number of banners will share initiative for the purposes of resolving Gambits. If councils in conflict contain memebers from the same House, both councils will count as having the support of that House. In cases where simultaneous resolution is impossible, Control will make the call which best supports an interesting narrative.
💥 Conflict -
The battlefield table looks similar to the Map Rooms but is used for the resolution of more complex conflicts that require initiative and simultaneous action. Even so, this is for tracking purposes only and the Battle Map will be populated conflict by conflict, with no persistent game state. (aka; Not a War Map in the traditional sense.)
In Babayaga, conflict is abstracted away from the specifics of battle into a result based upon the orders given by each side. Battle Orders can be submitted much like Gambits, with one order form declaring each intended conflict. An attack can be declared by any house that fills out a ‘Battle Order’ and submits it to Control before the High Noon phase in the current round. Per Player, these must be submitted after Travel Papers but can occur before, or instead of declaring Gambits.
A Battle Order must be filled out in the name of the House with the most influence within their alliance, out of those committing to the battle. That House does not have to be the overall Lead House in their alliance, but must be the most influential of those intending to participate in a conflict action, as determined by their position of influence in their alliance. This House leader will fill out a battle order dispatch and give it to Control. A proper Battle Order will list; The targeted region, their base region (from which they are attacking), the attacker’s House name, as well as all the Houses that they believe are supporting them in the overall action. The number of banners committed from each House does not have to be listed but keep in mind that one banner can only be committed to one conflict each round.
Only adjacent regions can be in direct conflict.
Each banner can only count towards one battle per round but Houses can commit to multiple battles if they have the banners to do so. These are the banner’s levied from the regions which they control, so more regions will mean more banners and the ability to contest more regions. If a Player is over-committed, meaning that they have committed to more conflicts than their House has banners to support, that House must determine which battles to fight in that turn and which to abandon before each are resolved.
Note; Player characters do not have to travel to the Battle Order conflicted regions to commit their banner forces into a Battle Order. Each banner is considered an army under that Player’s control, separate to the Player character themselves. However, for an army, having their Banner Lord present, in person, will affect morale and sometimes affect the outcome of a conflict.
Usually the Governor player of a House will be the one conducting the realpolitik for their House but all Players have discretion over their own banners. This means that each Player can independently agree to support conflicts using their banners (loyal troops) without the ‘permission’ of their House leader, just as the Governor may feel empowered to declare those banners on the Player’s behalf. Communication is important in this regard, as well as clear lines of hierarchy and established domains within a Player's House.
🗡️ Commencing Battle-
Operational Security -
Once all the banners have been loosely committed to an attack, the conflict can be brought to the attention of Control by submitting the Battle Order in written form. Attacking Battle Orders must be submitted to Control, in the same round that they wish for the battle to be resolved. Control will then inform the opposing side of the attack. Players should not try to bring the conflict to the Defender directly, but may use a pending alliance or unsubmitted Battle Order in diplomacy as they wish. Caution is advised, however, because if the Lead House on the side being attacked, can quote the nature of the attack in sufficient terms to Control at the time of resolution, then the defender will be considered to have initiative in the conflict regardless of how many troops are brought by the attacking force.
Forming Up -
When a battle is called, at High Noon, participating Players will bring their supporting Table Banners from their alliance or home table, to the battlefield table area. The Banners should be arranged opposing each other in alliance formation, following descending influence order left to right. This does not have to match the order that the houses are listed on the Battle Order but must follow the influence order of the primary alliance on either side. Assistance from banners outside of the primary alliance on the Battle Order can be placed at the end of the order, to the right of the alliance members, in any order.
This will be the telling moment where promises will be tested and both sides will see who has actually chosen to show up on the day. If a House or Player who has committed banners to the Battle Order brings fewer than promised, or fails to show up at all, the battle cannot be cancelled as the forces are considered to be committed. There will be some exceptions where a ‘retreat’ is allowed at this stage but they are situation dependent and if the Player can, they will be informed before this point.
⏩ Initiative -
In conflict, if the defending side is unaware of the attack against them, the side with the fewest banners brought to a battle will be considered to have ‘initiative advantage.’ This is to simulate the ease of distributing orders and concealing movements over fewer forces.
The side with initiative advantage will have their orders conducted last, giving them the opportunity to react to the manoeuvrings of their more encumbered foe. If the attacking force proves smaller, they have the initiative and are making a surprise attack, the defender will not be able to respond before battle commences. If the defender has fewer banners, in the Region being attacked, they will be notified of the larger, attacking army and be given a chance to call in additional defences.
If the defender holds the initiative, they may take the enemy’s Battle Order dispatch and try to gain support from their alliance before, Forming Up. If the defender does not hold initiative advantage, they may only bring as many banners as are able to be committed from their own or adjacent regions.
🧨 Conflict Resolution -
Once the banner numbers have been finalised, the battle may commence. The winning side is determined by victory points. By default, defending Regions have two victory points (2VP) for being entrenched. Attackers will only gain one victory point (1VP) by default in comparison. Unmodified, that means that defenders will always have the advantage and win. However, gaining the initiative gives that side an additional victory point. This would put the defence on three or both parties on two a side, depending on which side held the initiative advantage.
Each side will then further receive one victory point (1VP) for every multiple over the number of banners that their opponent brings. This means that if the attacker brings double the Banners as there are in the defending force, they will get one additional victory point (1VP) and vice verse. Each times double, over the amount of the opposition’s Banner count, will bring another victory point. E.g. Four banners versus two would bring an additional victory point, six versus two would give a 2VP bonus, and so forth.
Banner Lord Bonus -
An extra victory point is given to any Banner, who’s Banner Lord is present in person during a conflict. This would mean that a Player character had travelled to the region being attacked (or attacking) in anticipation of the battle. Be careful however, as though this action gives a boost to the troop’s morale, represented as 1VP boost, any Player character in place at a defeat can be captured or killed by their opponent.
To gain the Banner Lord bonus, the Player character’s travel papers for that turn must list at least the region that the Battle Order is targeting if they are the defender, or the region that the attack is originating from, if the Player is on the attacking side.
Infiltration -
If a Player’s travel papers list a region on the opposite side of the conflict in question, aka; Infiltrating, they can contribute a +2VP bonus but they are immediately revealed and captured by the opposed side, following the normal 'captured' rules, as if they had suffered a defeat and were subsequently captured in that way. In the case of this capture, the side that was infiltrated can choose to execute the captured Player regardless of if their side wins the conflict following the appropriate rules for executions. If the captured, Infiltrating Player character is not executed and the side holding the Player is defeated, they can be released, if the victorious side’s, Battle Leader chooses to allow it, that is.
📍 Objectives -
The most common objective for a conflict in Babayaga is to gain control over a region. All objectives must be clearly written on a Battle Order before submitting to Control as any ambiguity in an attempted Battle Order will be interpreted by Control and they have discretion over any undefined outcomes.
Players may choose an alternate outcome for victory by writing different objectives on their Battle Order. This can be anything they like which is narratively possible, backed by the threat of force and that serves their House or alliance’s interests. Perhaps a House wishes to target and capture a Player character who is present in the region, in order to ransom them back to their team. Or, perhaps they want to investigate a point of interest which they were not able to get access to through other means. Players should consult with Control if they have a particular outcome which they would like the conflict to lead into. If an objective is so written on a Battle Order, a version of this is the reward for victory in that conflict. If that happens, the attacking Battle Leader does not also gain control over that region by default. If the House would like to achieve both objectives they need to write both on their Battle Order dispatch. Defenders in a conflict are more limited in what they can achieve objective wise, beyond repelling their attackers. They should consult with Control on the matter, though, as shenanigans are heavily encouraged.
The attacking side in the conflict will suffer a negative one victory point (-1VP) penalty, per additional objective that they add to their Battle Order above one. That means that a single objective Battle Order will require less forces to succeed in, over a battle order with two or more objectives.
In the case of an objective to contest the ownership of a region, the Battle Order dispatch requires the attacking teams to specify which Player will take over that region, if the action is successful. If this is unlisted, Control will award the spoils of victory to the Battle Leader, that is the Player listed first on the Battle Order, and it will be up to them to further claim or redistribute the lands, or other rewards, as they so choose.
Objectives must be relevant in order to be applied. Meaning that a Player cannot attack a random Region and list “Become Tribune” as their objective with no narrative reasoning given for why it is even possible. Non-valid orders will always fail regardless if the conflict is won or lost. Winning a Battle Order also does not immediately cede control over the contested region to the attacker as mentioned. To have that occur it must have been listed on the Battle Order as one of the attacker’s objectives. Defenders cannot claim proactive objectives on their Battle Order at the start of the conflict unless part of a gambit or agreed with control prior to the Forming Up stage of a conflict.
⏭️ Flanking Actions and Contesting Regions -
All conflicts in a round are resolved simultaneously. For example, if a region attacks another that is itself attacking a third region; the middle region will suffer a penalty to its defence, gaining one victory point (1VP) by default instead of the usual two. This is because their defensive forces are considered depleted by the attack on the other region. This also means that a depleted region can never hold initiative advantage and cannot call in assistance from an allied banner. Regions that are attacking and defending in the same round are resolved as separate Battle Orders and different banners must fight in each conflict as they cannot be doubly committed.
Two Battle Orders can target the same region in the same round. Keep in mind that Banners are still limited to one Battle Order per round and both attacks will be resolved separately. The same banner cannot be contributed to both sides of a battle in the same round. In that circumstance, an attacker must coordinate two or more separate Battle Orders. Defenders do not have to choose in which battle to use their available banners as defensive banners are considered available for each defensive action. However, if the same region suffers an additional attack in the same round, they suffer -1VP penalty in the subsequent conflict as their defences are considered depleted. This penalty is applied regardless of if the defenders were defeated or not. (For instance, one Battle Order might target capturing a Player character and in the next they are intending to conquer the region. In this case the Defender could lose the first and succeed in the second, though in the second conflict they would suffer the -1VP for exhausted defenders and, in this example, an additional -1VP for losing their Banner Lord Bonus).
The exhausted defence penalty is also cumulative if the region is targeted by even more conflicts in that round but resets each round at Dawn. A defending region that is victorious in one conflict may call in more allied banners to help them in a subsequent conflict, if they would have been otherwise able to do so, i.e. they have initiative. This can be used in the same round to help overcome an exhaustion penalty. No defender may do this if they were defeated in the previous conflict that round. Any additional banners committed to defending subsequent conflicts must not have been use in any other conflicts that round.
🏆 Determining the Victor -
(In Conflict)
Once all victory points are tallied on both sides, taking modifiers into account, the Players will be dealt cards from the Battle Deck. The cards will be dealt beginning with the initiative holding side and descending in influence order, within each alliance. Each participating House is dealt one card (or uses their own if applicable, explained more later) with the intent that the highest card will give the drafting faction victory points equal to the rank of the card they receive. Ranks are determined by the included table and do not translate one to one with the number or suite of the card. Only the highest card on the table, after the draft, will award any victory points. The side with initiative reveals their cards last so as to have advantage of choice depending on what their opponent does with their cards.
Each player draws their card face down, except for the Battle Leader of either side. The Battle Leader is the representative for the House with the highest influence in their faction and the Lead House marked on the active Battle Order. If all banners on one side are from the same House, then the Battle Leader will be chosen based on primogeniture, with reference to that House’s family tree. Each House gets dealt only one card, regardless of how many Players, or Banners are present from their House at the battle. Each House can, however, play to the conflcit as many other cards as they can secure through different means. (See, the ‘Materiel’ resource.)
The battle leader can look at their dealt card and decide to do one of two things; They can either ‘call for strategy’ or ‘call for tactics.’ If they call for strategy, each House of their alliance draws their card, away from the opposing team’s view and can consult together (if more than one) on the best poker hand that they can make with the cards that they have access to or have been dealt. If the battle leader instead calls for tactics, then their side will not pick up their cards, yet.
The opposing side, the side holding initiative, will then do the same, selecting either strategy or tactics. Once the side without initiative has called their approach, they may not change it. This is the advantage to the initiative holding team playing last. The initiative holding team may choose which approach they will take, in reference to what the first team has chosen. If the non-initiative holding team choose tactics, they must not reveal their cards until the initiative team have selected their approach. If the non-initiative holding team chooses strategy they may pick up their cards immediately.
If tactics is chosen by both sides, all cards are revealed to the table with the highest card value shown, winning for their team victory points equal to the type of card that it is as descibed in the included table. If one team chooses strategy and one team chooses tactics, a poker hand will almost always beat tactics unless the only poker hand possible is a high card. In such a case tactics would triumph regardless of suit/number on the high card. If a tactics draw versus a strategy hand, shows an ace versus any poker hand, it is also considered a victory for the side playing tactics. If both sides choose strategy, the best poker hand wins.
In victory, the winning side adds the points to their overall victory point total and the side with the most points is considered the victorious party or parties in the conflict.
Poker Hands vs Tactics:
| Poker Hands | Approach | Reward |
|---|---|---|
| High Card | Strategy | Cannot win (even if an ace) |
| High Card | Tactics | VP per Rank (See below) |
| Two of a kind and up | Strategy | 2 VP flat for the superior hand. |
| Ace High Card | Tactics | 4 VP |
Tactics Card Ranks:
(Normal suit order counts in a draw.)
| Rank: | Reward |
|---|---|
| Number Card Black | 1 VP if the winning card |
| Number Card Red | 2 VP if the winning card |
| Face Card | 3 VP regardless of suit, if the superior card |
| Ace | 4 VP |
It is possible for an alliance to win the draft but lose the battle if their winnings do not overcome the victory points of the opposition. The side with the most victory points after the draw triumphs, succeeding the objectives on their Battle Order if attacking, and denying them if successfully defended. In the event of a tie in the draw that cannot be resolved by suit order, no additional victory points are awarded to either side.
📤 Conflict Outcomes
Transferring Regions -
If a region is successfully captured through conflict, the incumbent must cede the captured region’s sword token to the victor and divest the table banner which the region provided them. The victor may then claim an additional banner, adding it to their own forces and open a new resource board. When a Player loses control of a region, they must also divest the resource board that the associated Table Banner allowed them to manage. (More on Resources later.)
Player Exile -
Any Player who loses their home or final territory, in conflict or otherwise, is considered in Exile. The Exiled Player may retain their last table banner as this represents their personal guard and most loyal forces. Should this occur, the Player must divest the resources board associated with their final region and may only launch attacks, or defend, with their last table banner as a part of a Battle Order led by their own or an allied, friendly House. A Player cannot lead a Battle Order if they hold no land. If the exiled Player’s home region is recaptured, it is up to the Leading House of that successful action to decide if the Player is reinstated or if the land is given to another noble. The Exiled Player may also achieve or receive other regions through negotiation and other means as normal.
When determining the battleline in a conflict, any exiled Player's banners should be placed in the right most position on the battlefield.
🙇 Captives -
Any defeated Banner Lords present in a conflict can normally be captured if certain criteria are met. If a Player is ever located in a region that gets conquered by an army loyal to an opposing side, (usually through having used their Banner Lord Bonus in the Defeat) they may be taken captive. This can happen either through an objective from a successful Battle Order or through the capture of the region. Any Banner Lord present in a defeated region is vulnerable to capture, regardless of the objectives listed on the successful Battle Order, unless they specifically tell Control before the battle that they are not participating in the battle and ceding their Banner Lord Bonus. In this case, they will be immune from default capture but their side will not benefit from the victory point for having them present at the battle. Players that do this will still be vulnerable to attacker objectives targeting their capture specifically. If a Player thinks far enough ahead, they may draft any Gambits in the previous rounds with the intent of helping them to escape from a lost battle and capture. However, a successful battle objective to specifically capture that Banner Lord, will always supersede singular Gambits of that nature. Counter gambits would then supersede the Battle Order, though any opposing Gambits to assure the players capture would then sway the matter back again.
Capture is represented by the victorious House holding the table Banner of the defeated Player(s) at their own team/council table. A captured Player may act as normal in a round while their character is considered captured with the key exceptions of submitting Travel Papers, and participating in Battle Orders. This is because the Player will be considered held in a region or location of the captor’s choosing. Being captured may have other effects that come up in play. Captured Banners have no affect on the influence order of the capturing alliance or House, and cannot be used in conflict until the capture is resolved. Only one banner needs to be held by a captor, any other table banners that the captive holds due to lands can be left where they are at the time of capturing. These banners are vulnerable to capture in other conflicts like normal and can be deployed in Battle Orders by other members of the captured Player’s House or alliance.
The captured Player may submit Gambits each round to try and escape or achieve other outcomes while imprisoned. Other Players can also submit Gambits to try and release them. A House that is holding captives can counter Gambit to increase their own security, etc. If more Gambits to escape are undertaken then those to counter, the Player might escape. The last remaining Gambit targeting the captive Player, without opposition, will be the result. If the Player succeeds in escaping or is released through other means, they can return their banner to their chosen alliance as normal. If the region which a Player is being held in is captured by friendly forces, they can be released in the same fashion, though this is up to the Battle Leader of any such actions to determine this. The same applies to ambivalent or other hostile forces overtaking the captured Player’s location. Players can choose to switch their alliance at any time in order to be released, if that is offered to them.
The apprentice candidates to the Babayaga are considered captives and their banners should sit at Baba’s House. In this case, the candidates could leave at any time, however, this may have ramifications with Baba and their House should they choose to do so. If one of Baba's apprentice candidates is captured then once released, they may choose whether to return to their House or Baba.
Hostage Taking -
Hostages are mechanically captives for the purpose of the game, though there are more reasons for the Players to be taken and to take hostages such as political manoeuvrings and providing collateral. Any Player can be willingly taken hostage, giving up their ability to travel in order to serve some agenda of their House or others. This is a dangerous action though, as trust may be thin and any Player, taken captive by another House is vulnerable to execution at the behest of their host alone. Hostage takings and returns can be instigated at any time but for placement purposes, the Player’s game location will not change until the following round. This can affect things like duels where the Player’s region must be taken into account.
Moving with Captives -
Travel Papers cannot be submitted on behalf of a captive or hostage by any Player holding them in order to move them to a different region, but there is a section on their own papers to list any Captives moving with them. Mechanically the captive Player’s character can only move to the same location as one of their captives as listed on their papers. Escape gambits by the captured Player will be more likely to succeed on turns where they are being moved.
🎠 Jousting -
In addition to battling in conflict during High Noon, Players of any House may choose to host a Joust. Jousts can be announced during Dawn in any round and take place later in that round during the time where conflicts are resolved.
To host a Joust, the Players from one House must select a region that the Joust will take place in, determine which other Houses/Players are invited to participate and announce the Joust during the next Dawn Phase.
Any House that hosts a Joust must pick one of their home regions to act as the location and Player characters may choose to travel there in that round to participate. Not all Players need be invited to a Joust, but the Joust must be announced publicly, along with the explicitly invited parties.
Anyone who hosts or participates in a Joust during a round may not participate in offensive combat that round, though their banners may be loaned out to an allied Player for such a use. Players must still attend any Defensive actions during the round of the Joust, but may never use their Banner Lord bonus as their character is considered otherwise occupied. Any House Player can Joust against any other House Players who travel to a Joust in order achieve renown. Jousts can be held between Houses, Alliances and even Individuals, allied or not, and serve to gain the those entities, Renown.
No Player is required to attend a Joust, even if explicitly invited.
Players attending a Joust in a particular round, must move to the battlefield tables at High Noon much as in conflict actions. Jousts will be resolved along side actual conflict but Players need not bring their table banners to participate in a Joust. They may either put their banner forces in the care of another for that round, or bring them anyway, in case they are required to fight in any defensive actions, that round.
Resolving a Bout -
Jousts must be overseen by Control to be considered valid.
In Jousts, Players challenge each other with a wager in Renown tokens. To accept a challenge, the other Player must match or exceed the wager. If a Player is unable or unwilling to accept a challenge by staking at least the matching number of renown tokens, they may either demur completely, or counter stake, filling in the difference with infamy tokens to the same or greater value. The challenging Player, in that case, would have the choice to carry on with the Joust, accepting the stake, or raise the stakes again. Alternatively at that point, they may demur entirely.
No Joust can be staked with a wager using infamy from the outset. Infamy can only be used as a counter wager.
It is not often heard of, but particularly famous Jousts have been fought over the control of particular land titles.
If either the challenger or the challenged ends up demurring or is unable to meet the stake; Control may choose to give them infamy in response, and their opponent is free to challenge them to a duel instead if they so wish.
If the wager is accepted; Dice of the number of total tokens used in the wager are added to a cup for each Player. If the Joust is over something else, Control will set the number of dice to be used.
Players face each other directly and upend their cups onto the table, in a similar fashion to liar’s dice. With the dice covered, each Player starting with the challenged, claim how many number of a result their dice are showing, i.e. four, fours; three, twos, etc.
Player’s will then lift their cups and reveal the result.
The Player who gets the most dice correct in their cup has ‘won a pass,’ and may remove one die from their cup. They will then try again, starting with the Player that lost the previous pass and repeat the process.
When one Player removes the last die from their cup, they are considered to be the victor and their opponent is considered ‘un-horsed.’ The victorious Player may claim the stake for their bout and Joust again if they like, and if there is time.
The un-horsed player may not Joust again that round.
☠️ Death and Assassination -
Baba is known to have a penchant for the more sinister intrigues and sometimes people deemed to have no appropriate uses, just seem to disappear. Other Players too, may start to believe that the only way to go up, is to have someone else taken out.
In these cases, whether by gambit or execution the penalty for death to a Player is somewhat trivial for the Player themselves, yet quite final for their character in question. This distinction is made, not to distance the Player from their character persona but to give consequences to their actions without removing Players from the game. The penalty for a character’s death in play, takes the form of the Player instead occupying the position of a descendent in their House.
The Player must find their House’s family tree, adding an entry for their new character (and determining a spouse if they are a direct descendent) drawing in the new line to indicate their new Player character’s position in the family. All Gambits that were in progress from the previous Player character will end, unless they were already actioned, and the Player starts anew, possibly and crucially, one step further away from, or closer to the Tribunate. Now, what could a particularly motivated young courtier do about that, I wonder? If a Player, picked to be an apprentice candidate to Baba dies, they follow the same process but do not have to return to Baba as a hostage unless a new arrangement is made. What the House in question does about that situation is between them and the Hag.
Death can happen for a variety of reasons in the game. Maybe a defeated Banner Lord is executed instead of ransomed, maybe an ambitious Player lays a Gambit to knock out a rival, etc. Assassinations between players are handled through Gambits like any other scheme. Affected Players will normally be informed by Control that they have been assassinated if the Gambit was successful, or in some cases can be given an opportunity to avoid the outcome.
If a Player submitted a Gambit in the previous round to increase their personal protection or alert level for assassinations, the attempt may silently fail with the Player none the wiser. This is also where a Player might use ‘Intelligence’ to help gain information about potential assassination attempts or to find out who may be most interested in their demise.
🤺 Duels -
Duels can take place any region that the challenged party chooses on the map. To initiate a duel, the offended player must challenge the offending party in front of witnesses (and at least one Control Team member). The fight takes place at Dawn in the following round.
If the duel is denied, the challenged must either offer apology and accept a penalty defined by the challenger, or flee in ignominy, potentially losing face with their House and alliance. If the duel is accepted, both players must select a second, that is another Player to support them and, if needed, fight the duel if they are unable. Then the challenged party chooses a location on the map at which to meet at the beginning of the following turn. The duel takes place at the battlefield table.
A duel can either be resolved by ‘blade’ or ‘shot’ and the fight can be to the capture, or death. If the challenged selects ‘shot,’ then both Players conduct a best of five round of scissors, paper, rock to determine the outcome. If they select ‘blade’ the Players will let the cards decide. Each Player will be dealt a five card hand from a prepared ‘blade deck’ and play a full round of the ‘Way of the Blade’ trick taking card game; See the section “Way of the Blade.”
In either case, the victor may choose what the result of their victory leads to. If they fought for capture, nothing stops the victor from killing instead, except their word of honour of course. In the same way, in a fight to the death they may choose to spare the losing Player, taking them hostage instead, or allowing them to leave. Any Player who is involved in a duel may not commit banners to a conflict or submit travel papers that round. This is because their character is considered busy or distracted. Players may, on the other hand, submit Gambits if they can find the time before High Noon. Duellists must bring their Table Banners to the battlefield table with them when they face off. Any additional banners that they control can be commanded by another player in conflict that turn. Seconds are free to play the game as normal other than submitting Travel Papers that round, as they also must attend the duel.
Locations and Cowards -
It is important to note that while at the duel location, all four of the Player characters, inclusive of the duellist’s seconds, are considered as having travelled to the region selected for the duel. The Players are considered to have travelled to the duel’s selected region for the rest of the round. If Dawn arrives and the challenged (or challenger) does not, then their chosen second must step into the duel as their replacement and the duel must be carried out with ‘shot,’ not ‘blade’ as their chosen weapon. If neither the Duelist or their second arrives, then the duel is called off and the absent duelists may be considered cowards.
Players who do not attend their duel may submit travel papers and fight conflicts as normal. The duelist who does show up in this case (as well as their second) have the same restrictions as if they had fought the duel with the exception that they may fight conflicts, just not in person. There is no mechanical penalty for not attending a duel, but there will likely be very real fallout in the other areas of the game.
🔫 The Way of Shot -
The Way of Shot (WoS) is a way of resolving duels quickly through firearms. Arms like these are quite new in Jarlsland, unreliable, but devastating if effective. Both Duellists will move to the centre of the room, back to back. Control will call for a number of steps to be taken before both duellists will ‘turn and fire.’ Duellists must then turn on the spot and show the other combatant one symbol representing either; Paper, Rock, or Scissors, following the traditional rules for that game.
Because of the unreliability of the firearms available to the duellists, they will repeat this action five times with the most wins in five being considered the victor. When duelling by way of shot, the duellists must pick, in advance of the duel, whether it is to the death, or to wounding and capture. Even if the duellists choose not to fight to the death, Control will flip a coin and the loser has a fifty percent chance of being killed on accident when duelling with shot. Seeking satisfaction is a dangerous game, after all.
⚔️ The Way of the Blade -
Way of the Blade (WotB) is a simple trick taking game at which Players challenge each other when they select ‘blades’ as their weapon of choice in a duel. Each combatant is partnered with their chosen Second for the duration of the hand, sitting/standing diagonally opposite them.
Requirements -
• Way of the Blade Deck – A standard playing card deck with all of the face cards removed except for the Bowers (Jacks).
• Four Players – the Duellists and each of their chosen Seconds.
• Duels by the Way of the Blade take place at the Battlefield Table.
The primary combatants sit across from each other and their Seconds sit next to their opponents, cross-ways to their primary Duellist. All Players are dealt five cards each to begin the duel.
Fighting the Duel -
Leading with a suit of their choice, the challenger will play first and, going clockwise, Players will take turns playing one card at a time from their hand until no player can beat the trump card/suit that led the current trick. At any time after seeing their cards a primary player, (i.e. the challenger or challenged but not the Seconds), can choose if they want to ‘throw’ their hand, called a “feint,” by letting the other Player win the current trick. In this case, the feinting Player trashes the rest of their hand and their opponent wins the trick by default. In exchange, the Player who calls the feint is able to keep one of their current cards into the next hand. Players cannot ‘feint,’ in the same turn that their opponent does, the Player must take the offered trick when ‘feigned,’ an action which ends the hand and scores one point to the receiving Player. Seconds cannot feint.
At the end of each hand the winner collects their trick and must remove the most powerful card (trumps), putting it to one side, face down until the end of the Duel. This card is how tricks are tracked and also weakens the overall deck as the game continues. The rest of the cards are handed back to Control who will shuffle the deck and deal the next hand, with one less card than the previous turn. When the dealer would deal no cards, the duel is finished.
Communication with Seconds -
No one may talk during the duel other than to clarify rules. Seconds can, however, look at the cards of the Player sitting next to them and attempt to guide their Duellist’s decision. Seconds can do this only by playing cards, never through direct communication. That being said, Players may choose to strategise in advance about how to communicate with their Second during the duel, using their card choices.
Ending the Duel -
Each hand, one fewer cards is dealt, until any one Player can no longer challenge a trick. The team with the most tricks at the end of the duel, wins. Second’s tricks are counted towards the final score, meaning a savvy Player may choose to bring a Second that is more familiar with trick taking games, if they are less confident themselves.
Additional Rules Reference -
• The card which the Player keeps upon a ‘feint’ counts as their first card dealt in the subsequent round.
• When a Player wins a hand, they remove their highest scoring card from play and hold it as a point to track successful tricks. This makes each subsequent hand potentially weaker.
• The ‘Way of the Blade,’ deck has all of the face cards removed except for the Bowers (Jacks).
• Bower cards are called the ‘The Tribune’ and Aces are called ‘The Hag.’
• The Tribune is a trump card for most hands, being the highest value in each suit.
• Only the Hag beats the Tribune, i. e. the Hag becomes trumps if a Tribune is played on a trick.
• It does not matter which suit the Hag is it will trump a Tribune of any suit.
• All other cards beat the Hag.
• For the purposes of removing ‘the most powerful card’ at the end of a trick Hags count as one and are never removed.
Notes for Way of the Blade -
WotB duels take a long time and are complicated by design. If duelling Players have places to be, they should perhaps opt for the higher risk but faster method of duel by shot. Conversely, if wasting someone’s time is the Player’s aim, WotB will serve perfectly. Players should consider this heavily when scheming for their House.
♠ House Composition -
There are four Players in each team, representing the four most powerful family members in that noble House’s lineage. This power, however, comes with responsibility and each Player will be assigned a sphere of influence where they must pay their attention during each round of play. In each House there is a leader, this is the nature of primogeniture after all, and one member of the Player team will be assigned a briefing with the role of Governor. The Governor is head of a House (team) and manages the territorial holdings for their bloodline. The Governor Player has the technical authority to distribute lands and honours to their House as they see fit.
It is important to note that for the purposes of the game; Players will receive their own brief and starting lands are given to them as a part of that. Some Players will be placed in more powerful roles at the outset, but will in turn suffer greater scrutiny because of that power. No head of House Player can choose to subordinate another Player, before the start of the game by withholding these resources. Any attempt to do so, by any Player, will be ignored by Control when considering outcomes. It is a different story once the game has commenced, however, as the narrative will assume that the Governor of any one House is in command and that actions against their will are considered treasonous. Players should not take this as a mandate to acquiesce, indeed; If a Player has the resources and feels the need – treason is merely a matter of perspective, when it comes down to it.
Primogeniture -
To determine primogeniture, and each Player's position in their House; Before the game starts, Player teams will be sent a segment of a family tree with several empty spots, one for each Player. They will need to discuss amongst themselves who will represent which gap in the family tree. These family trees will be different for each house, and fit into a larger aristocratic family tree which will be initially kept opaque to the Players. It is important that Players only fill out the corresponding slots and don’t attempt to change any other branches of their family tree, as each corresponds to other game information and doing so would only put their own team at a disadvantage. The true heir is rumoured to walk amongst the current aristocracy and any living noble could have been the descendent, secreted away by the Babayaga, years before.
Each House family tree will have a space for the head of the house, this person will be given some additional responsibilities and will be treated as the leader at the start of the game, but it does not make them the supreme dictator of any Player’s personal actions during the game. It is advised that any Player placed in the head of the house position be more comfortable with ambiguity within the game, as they are likely to be under greater scrutiny and/or threat.
One House member must also be chosen to apprentice the Babayaga. This person will spend more time away from their other team members during the day and it is advised that each House select someone who may be more comfortable working independently.
Only once a House’s family tree is returned to the game organisers, will they receive their Player Briefings, so make sure to communicate with the Control team ahead of the game, if you expect to have trouble completing this task.
If a House’s family tree is not submitted by the listed deadline, Control will assign positions at random and send out the Player packs. These cannot be shifted or swapped once deployed, unless under particularly dire circumstances, so submitting early is recommended. The Player given the position of head of their House will be send a pack that names them Governor and they will have the responsibility to parse out other domains to their team mates as they become relevant, see more later in the handbook;
Character Death and Endowment -
In Babayaga, a player is never killed, only their character. If a Player Character suffers an ‘in narrative death,’ following the rules for death and assassination, the lands and resources held by the deceased Player stay with that Player even if their new Player Character is not a direct descendant of their previous one. Inheritance can be strange sometimes. This is non-negotiable and means that a Player can only ever lose their regions through targeted guile or conflict. A Player’s team cannot just take lands from them, even if their character has died between rounds. There is no rule, however, preventing a House betrayal where a Player’s assets are seized through conflict or Gambit.
🍗 Resources -
Each region that a House claims gives the holding Player access to a resources board which they may manage in order to generate primary production and crafted goods.
There are three main resource types in Babayaga that pertain to a region’s production; Vittles, Goods, and Materiel.
Vittles -
Vittles represent any food, water and other necessary supplies that are required for the region’s health. Each region by default will create for itself enough Vittles to sustain its population without interference. The region’s sword token will note this basic ‘upkeep’ value and while the region is producing the same amount as it is consuming, it’s morale is considered to be in good standing. If for some reason a region begins to produce (or retain) less than its ‘upkeep’ number, then it’s resources board will show that it is in ‘unrest.’ A region that is in ‘unrest’ cannot provide a Table Banner to conflicts in that turn and it is vulnerable to Gambit’s targeting its population's loyalty. Vittles can also be traded as a commodity to other Players.
Goods -
Goods are used as the primary trading resource in the game. Goods are useful for the manufacturing of Materiel and for creating better efficiencies in Vittle production. Regions cannot begin to produce a surplus of either of these resources, without first placing goods on their resources boards in order to advance the associated tracks. There are two kinds of goods, domestic and foreign. The goods produced by one House will be of that House’s colour. Some region’s resource tracks will allow the placement of domestic goods to increase production. Other spaces on these tracks will require foreign goods, before the region can further increase their output. Houses cannot produce foreign goods and must trade with other Houses in order to collect goods of a different colour to their own, in order to satisfy this requirement.
Materiel -
Materiel is an abstraction of the fabrication of military products for use in warfare. If materiel is produced by a House’s industry, it will always take a space that could otherwise be used for the production of food or goods. One materiel can be exchanged for a draw of a single card from the battle deck, which can be used in the place of cards given to the Player in conflict. There is no guarantee that this card will be useful, but it does guarantee what that card is, and crucially, it removes a card from the battle deck for everyone else, while it is held. If the card is used in conflict, it is depleted and returned to the battle deck. If the Player/House chooses to use their materiel cards in conflict, they cannot retain other unused cards dealt to them in the Battle Order, they must return them as normal. This trade of for domestic production and warfare represents the associated power imbalance towards factions who place themselves in a war economy. Players should be careful not to over produce materiel because for every one unit produced, the region has lost the equivalent vittle production capability. If that ability drops too low the upkeep cost on the region will not be met, the region will go into a state of unrest, losing the House one Table Banner in conflict for that round.
Region Resource Board -
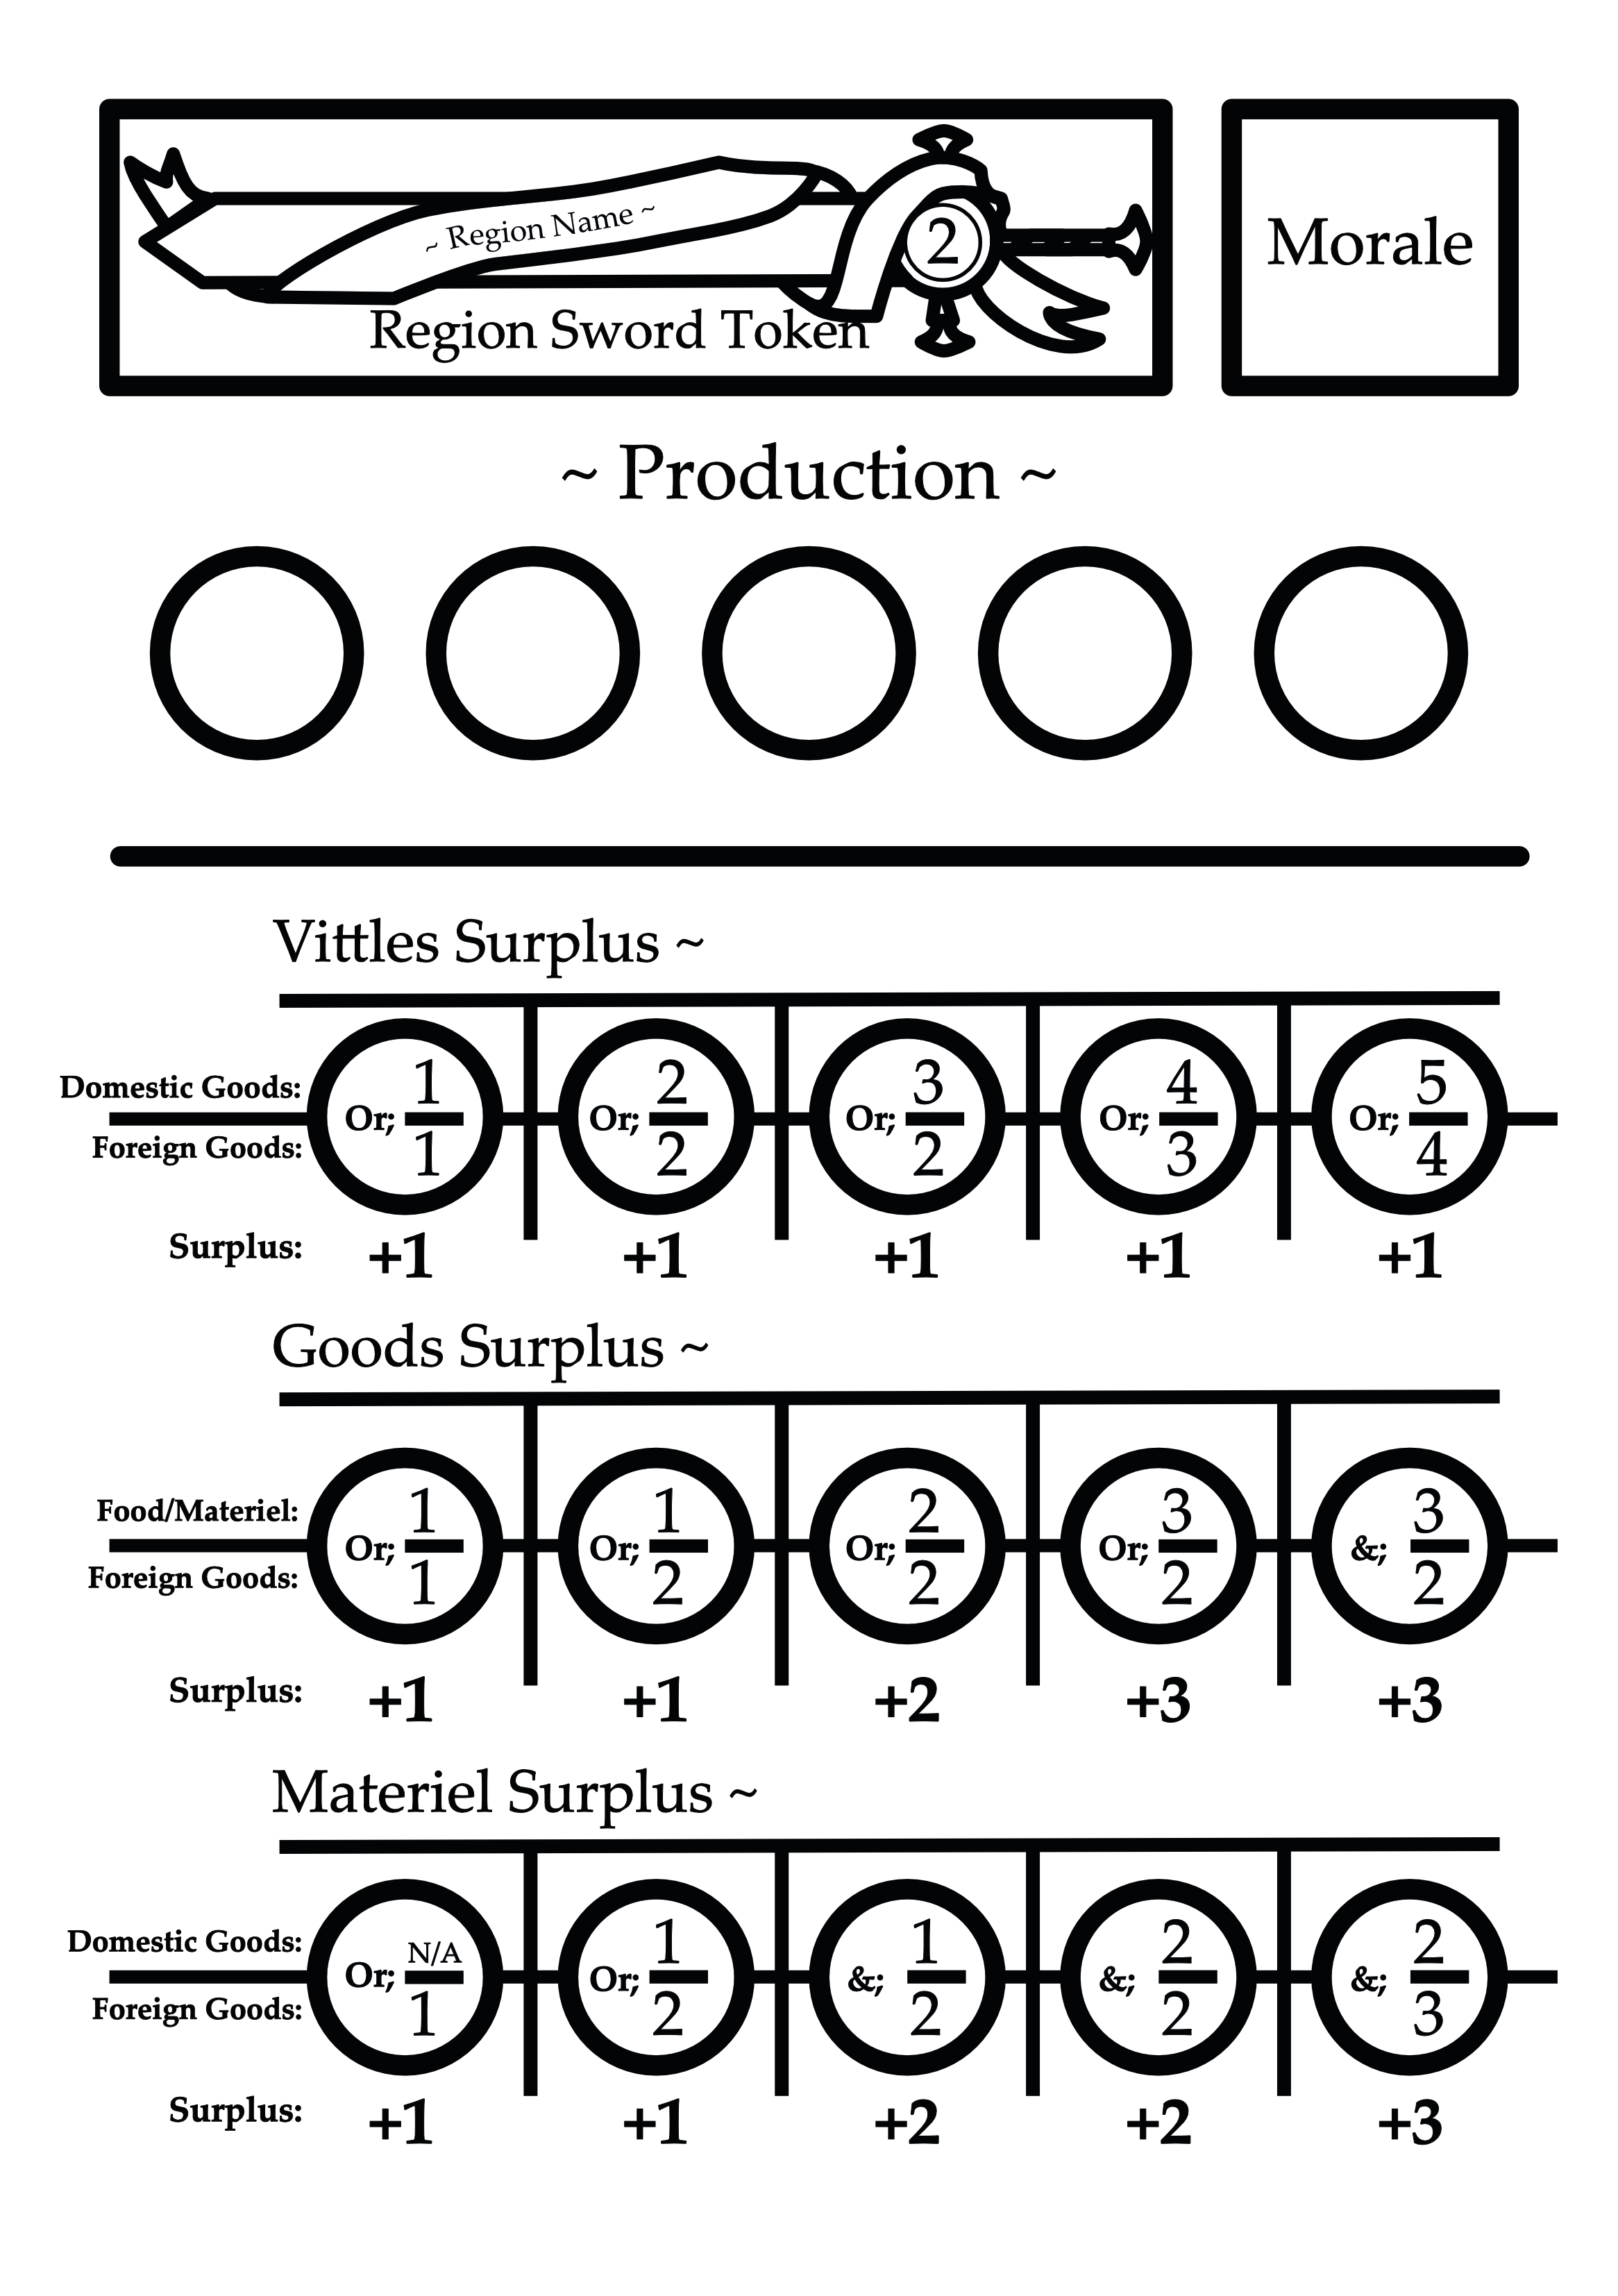
Generating Resources -
Beyond the Vittles required for upkeep, resource boards will show a track which provides a price for any additional surplus resources a Player may want to generate. Being a track, the Player is forced to generate up, from the basic production, to the more expensive options. This means that a Player cannot just pay the price to produce two additional Vittles from a region before they have paid the price for one. The total price for the second slot will be the cost listed on the first and second slot combined, in that round.
Resource boards are read by Control at the end of every round during Gloaming and the surplus resources distributed. Payment in a region for additional production (usually in ‘Goods’) is taken off the board by Control each round, resetting the production quotas to the base upkeep level every time.
Each region’s resource board will have five production slots. Depending on the number that any region requires for ‘upkeep,’ some of these slots will be prepopulated with the region’s necessary Vittles. The remaining slots are open for the Player to pay the surplus production cost and receive their resources. Players can choose to remove the upkeep Vittles, either to open a slot for other production, or to use the Vittles elsewhere, such as in trade. If Control reads a board that is below its upkeep cost at the end of the turn, it will produce that turn’s resources as normal but will be set to ‘unrest.’ When in unrest a region cannot produce any surplus until their basic Vittles are replaced up to the number listed for upkeep on their sword token. This resets every round so a region in unrest will not produce until the following turn, once Control has read a board and determined that it is back in good standing going into the start of a new round. Taking food from a region that needs it can be a necessary but risky manoeuvre.
Beta - There will be more examples here to explain how this mechanic works
🕵️♀️ Intelligence
Intelligence is a collectable resource that represents a Player’s knowledge in about a certain topic in the game. This is usually in reference to hidden knowledge or other topics that the Player wishes to investigate. Intelligence may be awarded for a successful Gambit action, or acquired by the House team’s ‘Spider’ role, through means that they will be made aware of on the day. For Players not in that role, they will most often see intelligence as a reward for a successful Gambit action or through successful Objectives during conflict. Where in some cases a Player may be told a secret about the game, another Player, or the lore of the land directly; Intelligence represents a piece of information, not yet defined. This deferral represents the Player’s forward thinking and preparation, being able to subsequently 'cash in' their Intelligence resource at a future, more opportune time.
Intelligence can be traded amongst Player’s freely. There is no limit to how much intelligence a Player can hold at one time. Players can use any, up to all, of their intelligence when ‘cashing’ it in for more specific information. Some outcomes will require more Intelligence resource than others, if the Player doesn't wish to gain incomplete or misleading information.
Cashing in -
Intelligence represents an abstract network of favourable sources. Whether that be a House’s spy network uncovering something, or a particularly studious noble’s discovery.
Intelligence can be used to influence other aspects of the game through ‘cashing it in.’ That means, leveraging networks or calling in favours. When filling out Travel Papers, Gambits, or Battle Orders, a Player may include one or more of their Intelligence resource to affect the outcome of the action they are undertaking. What that outcome is may not be defined specifically, but it signals to the Control Team, that the Player is leaning on their resources, more wary and prepared, or wishing to go into whatever action that they are undertaking with proper, advanced preparation.
Alternatively, a Player may cash in their influence, independent of any other action and signal to Control their interest in a particular subject. This can be anything from the details of another Player’s lineage, to rumours about the Babayaga herself. Players should keep in mind that the more difficult, or guarded, the knowledge, the more intelligence may be required to yield a result.
As Intelligence is their stock and trade, making any such inquiries may be more effective when the Player is, or collaborates with their House’s ‘Spider.’ That is, if they are trustworthy...
😘 Renown and Infamy -
Each House Player will begin the game in possession of an equal number of Renown and Infamy Tokens.
Renown -
Renown is awarded for winning battles, duels, and jousts. Higher renown makes it easier to achieve popular support in resolving unrest. A Player holding higher renown makes it more likely that banners who switch sides during conflict will desert when going up against their previously allied armies, rather than contributing to the result. High renown also makes it less likely that a region that is in a state of unrest will rebel against the owning Player’s control.
Players may trade or gift Renown freely.
Infamy -
Infamy is awarded to Players by other Players when they feel that the receiving Player has comported themself in an underhanded or unchivalrous way. All Players start the game with three infamy to give away, representing their word of mouth about the deeds of another Player. Players also earn infamy by mechanically betraying someone that they are in an alliance with - higher infamy makes it less likely that banners will desert when attacking a house that they were recently aligned with. Higher infamy can also help a Player to seize a region that is in unrest through the use of Gambit actions. Players may give another Player their infamy at any time and the receiving Player must take it.
There are some restrictions to this transfer of Infamy between Players. Players cannot give another Player multiple Infamy tokens in a row without having first given Infamy to another, different, Player. All transmission of Infamy by a Player to another Player can be witnessed by Control. Control is able to transmit or revoke from a Player any Infamy tokens, at their discretion.
Players hold both Renown and Infamy simultaneously but each cancel each other out by value. A Player with more Infamy tokens, than Renown, will be considered to have as much Infamy as the difference between the two, and vice verse. If a Player holds equal Renown and Infamy, then neither effect will contribute to any decision which they would otherwise influence.
Example -
If one Player was to hold three Infamy and three Renown but gifts a Renown token to another Player, if a decision is dependent upon whether they have Renown or Infamy; they would be considered to have one Infamy, one being the difference between both the resources that they hold, favouring Infamy.
💸 Taxation -
In addition to the upkeep Vittles which are required for a region’s morale, the leader of an alliance, or their chosen tax collector may levy a tax on certain resources. If the head of an alliance determines to tax a particular resource, Houses (the loyal ones that is), will have to make sure that their production is sufficient for both upkeep and the tax, before even considering their own surplus. Players are by no means required to pay taxes levied upon them but it could make things difficult in an alliance, if they flat out refuse.
🙉 Player Autonomy -
As an influential, blood member of the Jarlsland Aristocracy or another important family, each Player has autonomy over their own lands, resources and fate. By being born into the rigid hierarchy of the landed elite, there are strict expectations placed upon the members of each House.
This game is about a time of change and upheaval from which any outcome could emerge. So, where the Player can see white spaces in these rules; They have been intentionally left so that, with the application of creativity, any Player can seek to achieve within the game's space and time constraints, anything that they can describe. That is, so long as they work with the Control Team and overcome any, likely, opposition to their plans. This is despite any brief or initial standing given to Players at the beginning of the game, which everyone is encouraged to view as a starting point, not a prison. Resource boards for owned regions are entirely in the power of the Player that holds them and their personal loyalties cannot be compelled by any other Player. In short; no other Player can make you do anything, but collaboration can lead to greater returns.
👑 House Roles -
The Territorial Governor -
Governors, in Jarlsland, stand just one step beneath the Tribune in power. That step is a long one though and these House leaders are regularly reminded of such, being traditionally only allowed to enter the Central Province with a token guard and only under the will of the Tribune themself. Times of war have seen these strictures relaxed somewhat but the spectral reminder of a Governor’s distance from the crown is built into every mechanism of the state. These restrictions known as the ‘Jarls Law’ feature heavily in the break away Union doctrine as examples of freedoms which the Outer Territories are being denied.
It is a different story at home, however, where the Governor’s word is law and for the longest time, beyond the Tribune’s taxation, that law has been absolute. Each House leader enforces that absolutism with greater or lesser zeal but in a culture of strict social hierarchies, an iron hand that squeezes, often finds that the blood to follow is it’s own.
Soft power tends to yield hardier stock and all Governors have the power to choose which crops to water. A Governor’s chief role in a game of Babayaga is to manage the balance of favour, resources and influence which they imbue to their House, so as not to cause too much offence but also grow and maintain their own power base. Unique of the Player roles, the Governor does not have the responsibility for a particular section of their lands and economy but receive the resources from all through taxation. With these resources they can balance the focus of their land’s output, trade, and all the while try to keep their people from starvation. If this is too heavy a burden for such a busy mind, the Governor can favour one of their team members by delegating such decisions. Keeping an eye on how one empowers their subordinates is key to the Governor role and long term success.
At the start of a round, a member of the Control Team will bring the House table the produce of their land’s production from the previous round. Keeping domestic production healthy in a time of war is difficult but necessary to survival, even if a Player’s House is focused on a war footing. The Governor is empowered to levy any taxes of their own team’s lands as required, usually attempting to meet quotas set by taxation in their alliance. Governors can request any surplus, of any region that is held by their House. A loyal family member would surely acquiesce and a capable leader would approach such requests with a light touch.
Control will only hand the resources to the Governor, or his nominated, Keeper of the Purse, and may hold these resources if they wish. Other Players on the team will know how much they have produced and what they are due, so holding resources without willing taxation could prove problematic to the Governor Player and should not be done without good reason. Players can choose to at any time, support another House with the product of their lands and so will expect respect returned for their supplication to taxation.
The Governor is the only role assigned to teams, at the beginning of the game in the Player Briefs. The title can be abdicated, transferred, or seized during play but not before. The starting Governor Player must begin the game in that role and any subsequent transfer of power, no matter how swift, is to be recorded as an in universe secession in the game’s lore. Changing role does not change the Player’s bloodline. For the purposes of the game, that Player would be viewed as the former Governor of their House for the purposes of narrative.
The other key roles in a noble's House will be bestowed by the Governor Player as titles. The Governor may also revoke such responsibilies at any time.
Keeper of the Purse -
Within each House the Governor may empower one other Player with the ‘Keeper of the Purse’ role who acts as treasurer and quartermaster for their House. This is the only sanctioned Player who may make treaties with other Houses for the movement of Trade Goods outside of their regions. Players should remember that their own surplus is separate to taxation and must negotiate with the Keeper for adequate return on their investments. The movement of any resources by Players that are not part of an official trade agreement, as arranged by the Keeper, is considered smuggling and punishment for such underhanded dealing is at the sole discretion of the House’s Governor. The Keeper of the Purse is also empowered to manage the Governor’s own lands, when they are too busy to do so.
Marshal -
In times of war, a House’s Governor can appoint a Marshal, to assist in the prosecution of their interests across Jarlsland. This Marshal may command the Governor’s Banners into battle, in their absence and has the ability to form strategic plans within their own alliance or with neutral/friendly third parties. The Martial is not empowered, by default, to enter or exit alliances on behalf of their House but may do so if they choose. (Or feel they can get away with it.)
The Spider -
Each house maintains its own web of listening ears and concealed devices of guile. The House’s Spider maintains these networks and hears whispers on the wind. If a House’s Governor appoints one of their team members to the position of House Spider then inform Control and they will be given additional instructions at that time.
Other Player Roles and Responsibilities -
In addition to the titles above Players may find themselves in a few different roles, with different responsibilities;
Leader of an Alliance -
There are two Players who will start the game as the respective heads of the major alliances. These are the Tribune themself and the Governor of Tanann, head of the Rebel Union. These Players will also play the effective Governor role for their House and team. Throughout the game, alliances may shift and others come to the head of new or existing alliances. Apart from the loyalty and power that such a position commands and implies there are several additional responsibilities that an alliance leader must carry out. Beyond their own house, the leader of an alliance must place their other loyal banners in order of who they wish to favour most. Perhaps Houses will expect a certain amount of demagoguery or nepotism from the incumbent leader but this decision must be weighed carefully and the level to which these other Players are trusted must be taken into account. The arrangement of Table Banners can be done either on the leader’s own team table or in the Map Room for their alliance. There is no mechanical difference to this choice, just an optical one that is perhaps dependent on whether the leader believes that the alliance’s loyalty is better placed in the cause or in their leadership personally. Claiming the former to no objection could be a powerful move.
Leaders should keep in mind that there are mechanical effects from this hierarchy as it gives priority in resolution to gambits made by those banners placed higher and determines who gains the spoils in conflict. Allied Houses do not have to be placed together in priority and the distribution must be linear.
Master of Taxation -
Much as the Keeper of the Purse may handle the trade and taxation affairs of a noble House, the Leader of an Alliance may appoint the Master of Taxation role to any member of their alliance. Should any taxation be levied on the members of the alliance, the Master of Taxation may coordinate is payment or enquire to its absence on behalf of the alliance as a whole.
👤 Apprenticing the Babayaga -
When the Babayaga appeared, her bargain was as such; Each House will provide to her a noble from their bloodline to act as hostage while she deliberates upon her selection for a new apprentice. These candidates, sans her selection, are to be released on the day where the true heir is revealed. This is to take place eight weeks to the day of her first announcement. Neither the Tribune or the Volchenks Union would deny her this request, for fear that their enemy would gain the support of the Baba in war. Whether the Babayaga was believed or not, the chance was not worth the risk and the compact was sealed.
At the start of the game the Babayaga herself will visit each House and select one ‘random’ Noble from the team in question to apprentice her during the game.
The team does not get to choose who amongst them is selected by the Babayaga.
Bargains can be struck, however, and legend speaks often of the Baba’s jealousy, opportunism, and greed. Any noble selected must remember these traits, and the more successful Player will bend them to their own advancement. The Babayaga is no fool, however, and the Player is cautioned to remember that while serving underneath her roof, her word is law.
Players selected to attend the Baba’s kitchen table court will be instructed on their duties at that time.
🔔 Marriages -
There are two types of marriages in Babayaga; the political, and the convenient.
Political Marriages are made between Player characters and can be arranged by any House who believe that it behoves them to join their bloodlines in a strong alliance. Politically married Players can always come to one another’s defence in a conflict, regardless of which side holds the initiative. Marriages between Players also have the effect of welding two of the aristocratic bloodlines together, either in anticipation of, or despite the soon to be upset to the order of succession.
Marriages of convenience are either between a Player and a non-Player family member of a particular House, or two non-Player family members of any House. These non-Player members of a house can be drawn from the names pre-filled on each House’s family tree, who do not correspond to a Player character. Essentially, these are the Player’s aunts, brothers and other family of less importance within their House who can be married off in order to forge stronger alliances with the other noble Houses.
Marriages of convenience have all the same benefits of a Political marriage between Player characters, with the exception that these ‘off-screen’ family members do not hold any regions and therefore cannot be directly targeted in conflict. They are, however, susceptible to Gambits and assassination.
At the commencement of the game the nobility of Jarlsland are culturally monogamist by convention. Players are encouraged to do with or without that information at their discretion.
To organise a marriage of any type, the head of a House must approach another House representative with a proposal. This means they propose a marriage in general, it does not have to include specifics at that stage. If a proposal is accepted then the two Houses can announce the betrothal in the next Dawn Phase. The wedding itself can happen in theory, or the Players may host their own weddings if they so choose. The important mechanical component is the announcement of intent to marry, done publicly during the Dawn announcements phase.
The target House of a proposal may set any dowry price for the wedding in whatever resource they choose and the proposing Player/House must pay that before announcing the wedding.
Mechanically and narratively the Player would gain access to the lands of their in-laws and also gain advantage in actions targeting them such as Gambits or movement within their territory so caution is, naturally, advised.